
Workspace provisioning refers to the creation of new Microsoft Teams (including the group SharePoint Team site, group mailbox, and Planner board), individual SharePoint Team sites, Communication sites, and Viva Engage communities.
With Orchestry, end users can create workspaces that are customized to their needs and scenarios by using the Workspace Request Wizard. This wizard guides users through each step of configuring their workspace, from selecting the appropriate Workspace Template, naming the workspace, inviting members and more.
Orchestry Workspace Provisioning V.S. Native Provisioning with Microsoft 365
For those who wish to get the most out of Orchestry, it's recommended that M365 admins disable self-creation of SharePoint sites and Microsoft 365 Groups. Ideally, prior to rolling out Orchestry to end users.
This helps ensure all new workspaces are created with a foundation of security, automated policies, and content that people need to succeed.
Want to learn more about how to disable self-creation in M365?
Check out the article: How to Prevent Users from Creating Workspaces Outside of Orchestry
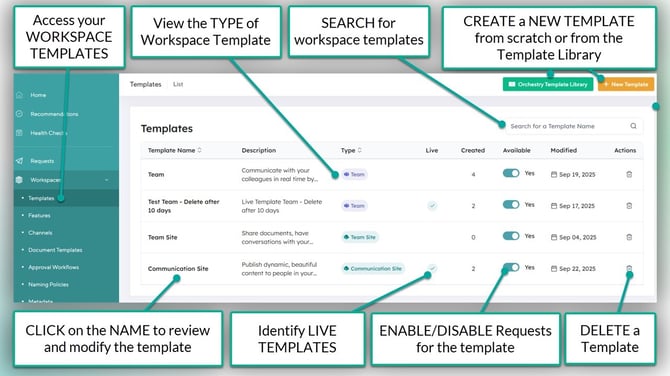
Workspace Templates Overview
Workspace Templates are objects created by Orchestry admins and offered to end users looking for their next project team, intranet site, etc. Admins can create and offer a variety of templates that are configured for different business units and needs.
Workspace templates can be configured in many ways to accommodate their target audience. For example, templates can include:
- A custom naming policy,
- Orchestry metadata,
- Orchestry policies (such as Guest Request, Guest Review, Workspace Reviews, and Archival),
- Container-level Sensitivity labels,
- Channels for Teams workspaces, and much more.
Want to get started with Workspace Templates?
Check out the article: Workspace Templates Overview
Workspace Requests Overview
Workspace Requests are how users create new workspaces via Orchestry. Requests are submitted through a wizard that guides users at every step, from selecting the right workspace template through selecting the colleagues the invite.
Using the Workspace Request Wizard
Workspace requests can be submitted via the Orchestry web app, the Orchestry Teams app, and the "Orchestry Requests" SharePoint web part. The Workspace Request Wizard provides a consistent for users, regardless of how they access it.
Once the request is submitted, Orchestry will either send it for approval or start provisioning the new workspace right way.
Reviewing Workspace Requests and Statuses
Users can review their open and past workspace requests from the "My Requests" tab found on the HOME page in Orchestry. In the Teams app, requests can be found in the "My Requests" panel:

Orchestry admins can be view any request from the "All Requests' tab on the Home page:
Requests are given statuses to help users understand what state their in. A workspace request can be assigned any of the following statuses:
| Approval Required: | Approval is required for this workspace before provisioning can occur. |
| Provisioning: | Workspace is currently being provisioned |
| Approval Rejected: | A step in the Approval Process has been rejected and provisioning will not occur. |
| Provisioned: | If the status of the workspace request is provisioned, then you will also see the View Log option available. This will show you the complete log of the provisioning process that took place. |
| Failed: |
If the status of the workspace request is 'Failed' then that means there was an error during provisioning and it could not be successfully completed. In this case Orchestry will provide the 'Retry Provisioning' option that allows you to try to provision the workspace again. |
How to Edit a Workspace Request
Orchestry admins can modify certain fields of a workspace request while it's in the "Approval Required" state. This can help admins ensure end users don't have to start over if there's a mistake in the request.

Editable workspace request fields include:
- Workspace name
- Site URL
- Description
- Workspace owners and members
- Sensitivity label (only if the workspace template is configured to USER CHOICE)
- Permission type (only if the workspace template is configured to USER CHOICE and not controlled by sensitivity label)
How to Approve, Reject and Archive a Workspace Request
Reviewers of workspace requests awaiting approval must either APPROVE or REJECT (with comment) the request to complete the task. Multiple people may be assigned the same workspace request task, but only one needs to approve (or reject) for the entire group.

If APPROVED, Orchestry will assign a new Workspace Request approval task to the next group in the approval workflow. If REJECTED, the workflow ends and the workspace will not be provisioned.
Want to learn more about workspace approvals?
Check out the article: Workspace Approvals Overview
Completed workspace requests (regardless of status) can be ARCHIVED to hide it from the list of requests.

Multi-Geo Provisioning Overview
Orchestry admins can create workspace templates that are designed to only be accessible in specific regions. This feature is only available to tenants that have multi-geo enabled.
Want to learn more about multi-geo provisioning?
Check out the article: Multi-Geo Provisioning in Orchestry
Questions and Answers
Can I Restrict Who Can Request New Workspaces?
Yes, you can. Limiting who can request new workspaces can be helpful when first setting up Orchestry, or when you want to create workspace templates that are only for specific groups.
Method #1 - Restrict ALL workspace provisoining to specific users:
From the 'Accounts' page (Settings > Accounts), you can specify the exact users and/or security groups that can submit workspace requests for your entire tenant.

Method #2 - Restrict who can request from specific workspace templates:
On the 'Security' tab of any workspace template, Orchestry admins can restrict access using Azure security groups. This allows admins to create templates that are purpose built for specific groups, while hidden for others.
Want to learn more about Workspace Templates?
Check out the article: How to Configure a Workspace Template
Can I Re-Use a Site URL in Orchestry?
Yes, you can. To re-use an URL, you will need to make sure that site URL has been freed up for use. Depending on the workspace type, this can include making sure that the related objects are fully deleted (team, site, associated M365 group, etc.).
If you are using Orchestry, an added step is to make sure that an existing workspace request is not blocking the desired URL. Please refer to the full checklist of steps to take (if not already) to re-use a URL:
|
Steps Checklist |
Actionable in Microsoft |
Actionable in Orchestry |
|---|---|---|
|
Delete associated group: |
Delete Group via Entra Portal: How to manage groups | Microsoft Learn Delete a Deleted Group via PowerShell: Remove-AzureADMSDeletedDirectoryObject (AzureAD) | Microsoft Learn |
N/A |
|
Delete associated workspace: |
Permanently Delete a Site: Delete a site - SharePoint in Microsoft 365 | Microsoft Learn |
N/A |
|
Archive existing workspace request: |
N/A |
In the Orchestry 'Workspace Requests' page, locate and open the Request, and press on Archive Request. Archiving the request will remove that URL from our query |
How Does Orchestry Validate Workspace Names and Site URLs?
Orchestry has a built-in workspace name and URL checker. Every time a workspace request is created, we check the following:
- Does this URL already exist?
- Are there any workspaces with similar or identical names?
- Does a workspace request with the same URL already exist in Orchestry?
As SharePoint Site URLs must be unique, Orchestry will only allow the creation of workspaces with URLs that are available at the time of request.
Unless a Naming Policy specifies otherwise, Orchestry sets the Site URL to be the same as the chosen workspace name. In this case, if the desired name or URL already exists, you will be prompted to change name/URL before proceeding with the request.
Can I Remove the Notes Channel Tab from my Teams Workspace Templates?
Currently, Orchestry cannot remove these new default Notes tabs that are automatically added when a channel is created. This functionality is quite different than the retired Wiki functionality as the Notes tab is added sometime after the channel is created.
Tips for Managing the new Notes Tab in Teams:
- To prevent two Notes tabs in each channel, make sure that your Live Template REMOVES the default Notes tab that was created as part of the channel
- When naming your custom OneNote Tabs, avoid using the name "Notes". If you do, you'll end up with two separate tabs both titled “Notes”, which can be confusing.
- While Orchestry allows you to arrange your tabs as you like, the placement and timing of the Notes tab, as determined by Microsoft, are beyond Orchestry's control.