How to Configure a Workspace Template
Last updated: March 30, 2026
Orchestry admins can create and customize workspace templates that are tailored to various business scenarios and use-cases. For example, you can design a template that is designed for INTERNAL project, and another template for EXTERNAL projects. Each with their own unique security requirements and customizations.
This article covers the settings available in workspace templates, across the different workspace types.
Want to learn more about Workspace Templates and Provisioning?
Check out the article: Workspace Templates Overview
Workspace Types
Each workspace template must be associate with one of the following WORKSPACE TYPES:
WORKSPACE TEMPLATE TYPE | HAS M365 GROUP |
Microsoft Teams | Yes |
SharePoint Team Site | Group-connected and non-group connected options available |
SharePoint Communication Site | No |
Viva Engage Community | Yes |
TIP: Orchestry admins should be aware of the differences between each template type. Keep reading to learn more.
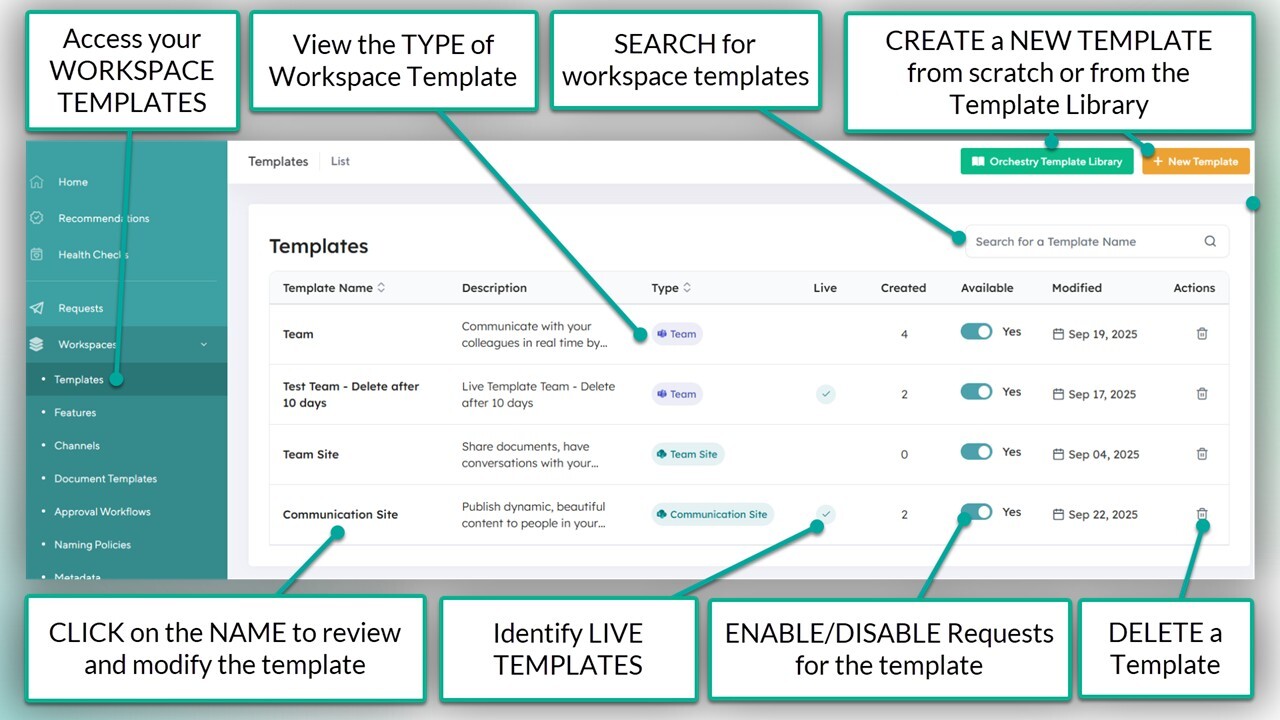
How to Create a Workspace Template
Workspace templates can be created and managed from the 'Templates' page in Orchestry.
How to Publish a Workspace Template
The most basic workspace templates can be designed and published in minutes by following these basic steps:
Complete all REQUIRED fields on the 'Details' tab, including 'Workspace Type'
Configure or disable the 'Live Template' tab
Complete all REQUIRED fields on the 'Configuration' tab
SAVE your changes. This will return you to the 'Templates' page
ENABLE the workspace template
Once your workspace template is ENABLED, end users can submit workspace requests from it.
Admins can continue to modify workspace templates to improve governance, security and customization options for end users.
NOTE: Workspace templates configured to a different data region will have additional limitations not listed in this article.
Learn about Multi-Geo Provisioning in Orchestry: Multi-Geo Provisioning in Orchestry
Workspace Template Configuration
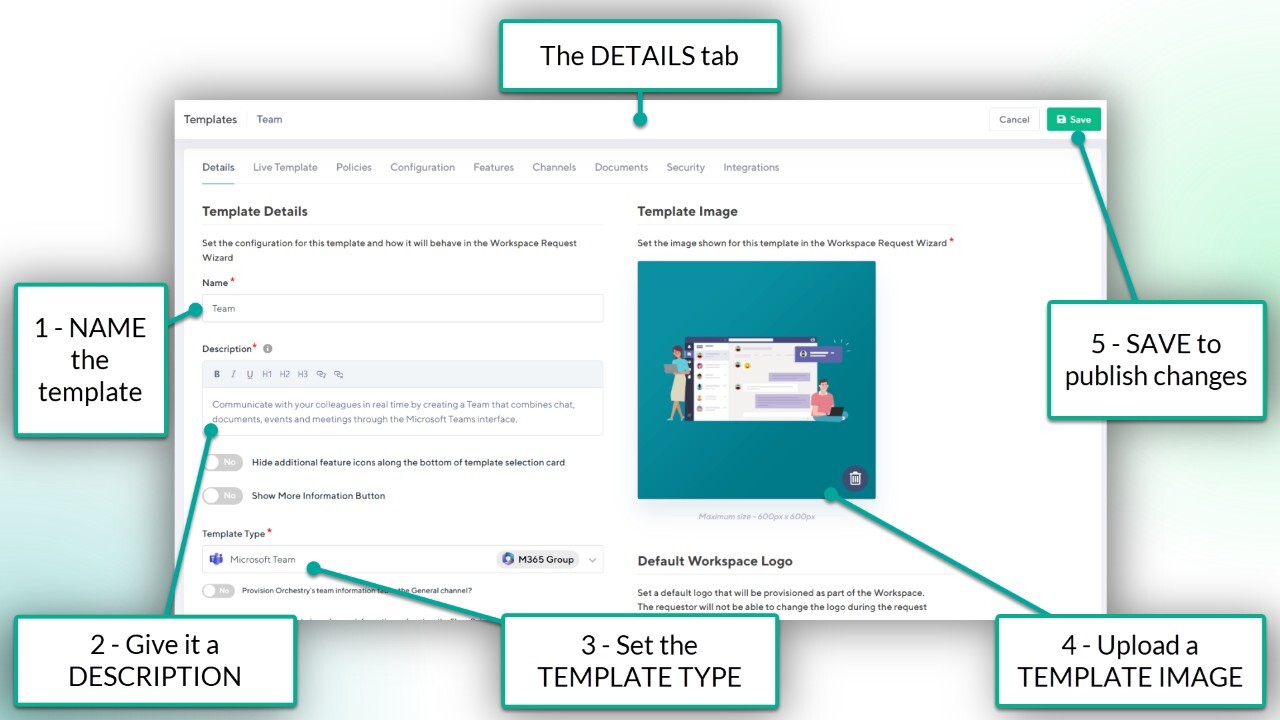
The DETAILS Tab
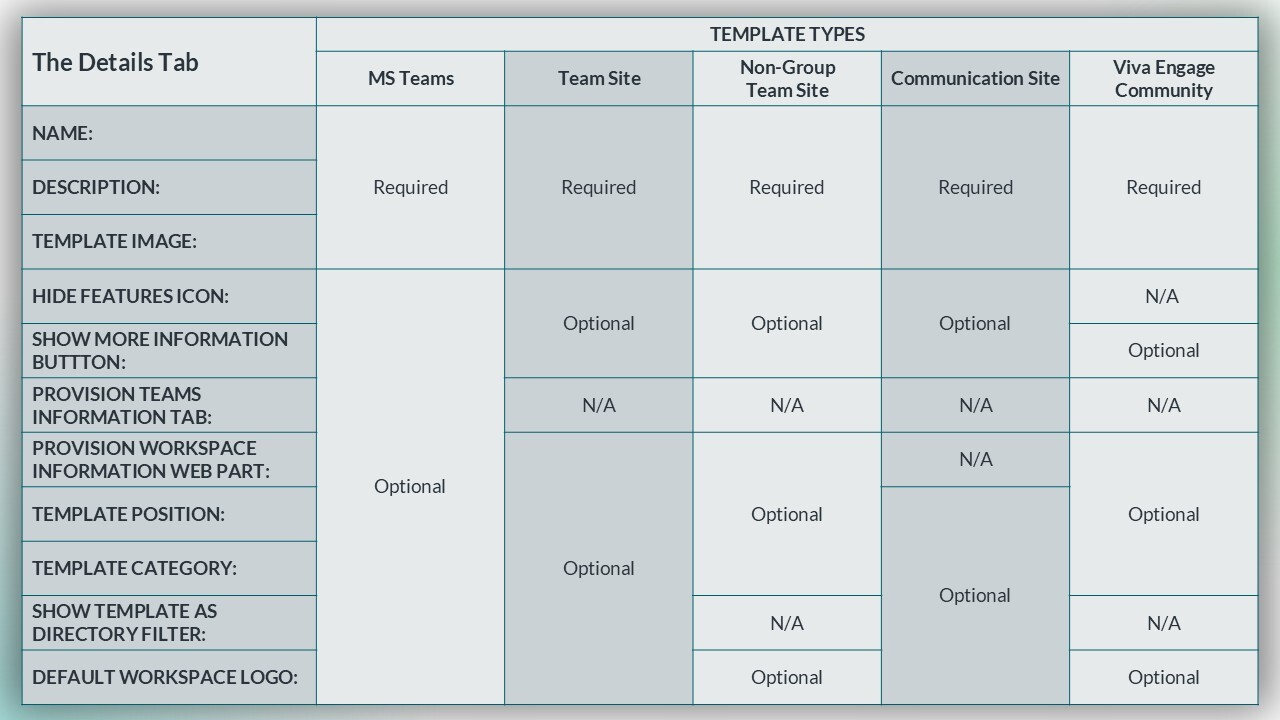
The 'Details' tab contains basic information about the template. The fields 'Name', 'Description', 'Template Image' and 'Template Type' are REQUIRED across ALL workspace types.
How to Configure the Details Tab:
NAME the template
Write a DESCRIPTION
Set the TEMPLATE TYPE
Upload a TEMPLATE IMAGE
SAVE your changes if you are modify an existing template
The 'Details' tab includes a number of OPTIONAL configurations that you can implement. The properties available will vary depending on the TEMPLATE TYPE.
Live Template Tab
The 'Live Template' tab allows Orchestry admins to connect the workspace template with an existing M365 workspace. This feature allows Orchestry to copy setting and content from the linked workspace onto newly provisioned workspaces.
How to Configure the LIVE TEMPLATE Tab:
Enable the Live Template functionality
Select a TEMPLATE WORKSPACE
Enable and configure the TEAMS settings (if applicable)
Enable and configure the SharePoint settings (if applicable)
Enable and configure the Planner settings (if applicable)
SAVE or move onto the next tab

FIELD NAME | DESCRIPTION |
Browse for Workspace: | Select the workspace to link to the template. List will only show supported workspace types. |
Clone M365 Group Members and Owners: | Membership from the source M365 group is copied. End users cannot remove them while submitting a workspace required |
Clone Team Channels: | Copies channels from source team |
Clone Team Channel Tabs: | Copies tabs from source team channels |
Clone Team Security Settings: | Copies Team security settings from source team |
Clone Apps: | Copies apps from source team |
Clone Additional SharePoint Site Pages: | Copies site pages and configuration from source SharePoint site |
Clone Content within SharePoint site Libraries and Lists: | Copies document libraries and site lists from source SharePoint site. Include custom fields, content types, views and files. |
Copy Planner Buckets: | Copies buckets from any Planner boards from source group |
Copy Planner Tasks: | Copies tasks from any Planner boards in source group. Includes NAME, DESCRIPTION and LABELS. |
The configuration options available on the 'Live Template' tab will vary depending on the TEMPLATE TYPE.

NOTE: The 'Live Template' tab is NOT supported in 'Viva Engage Community' templates at this time.
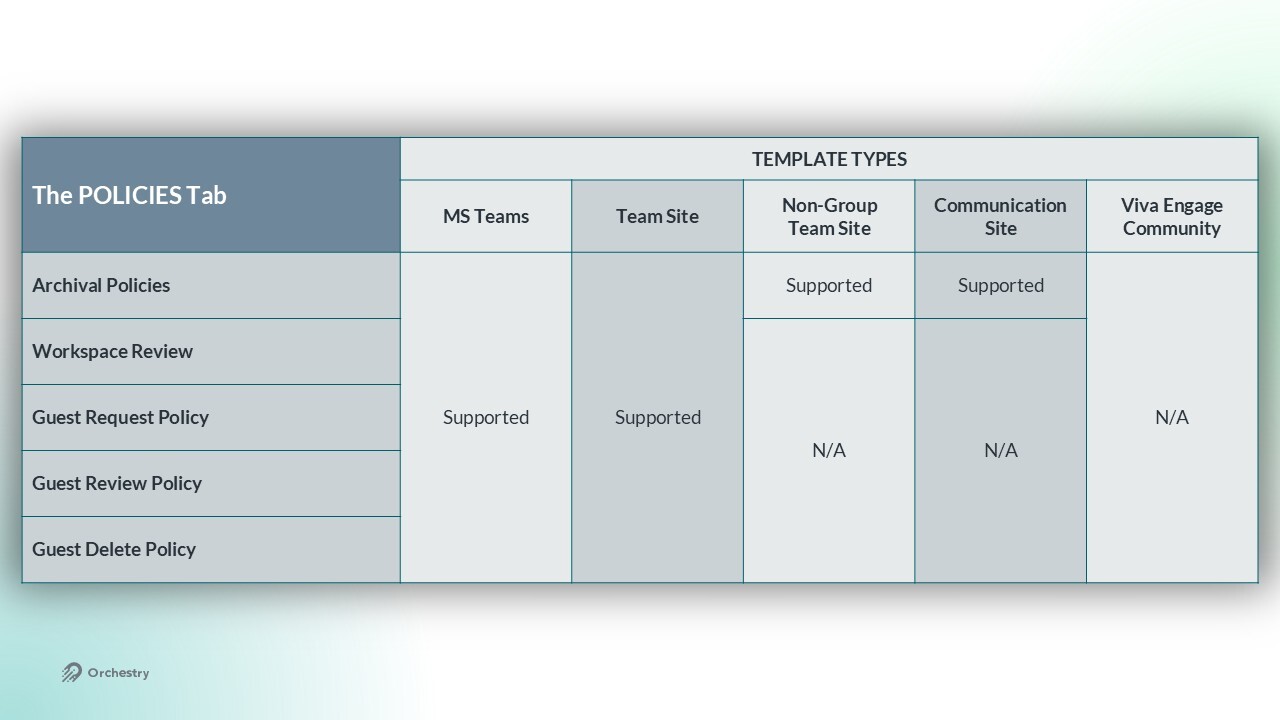
Policies Tab
The 'Policies' tab allows admins to assign Orchestry policies to the workspace template. This ensures newly provisioned workspaces are created with archival, workspace review and/or guest management policies from day one.
How to Configure the POLICIES Tab:
Assign an ARCHIVAL policy
alternatively, toggle the 'Exclude from Archival' option to prevent workspaces from being archived
Assign a WORKSPACE REVIEW policy
Assign a GUEST REQUEST policy
Assign a GUEST REVIEW policy
SAVE or move onto the next tab
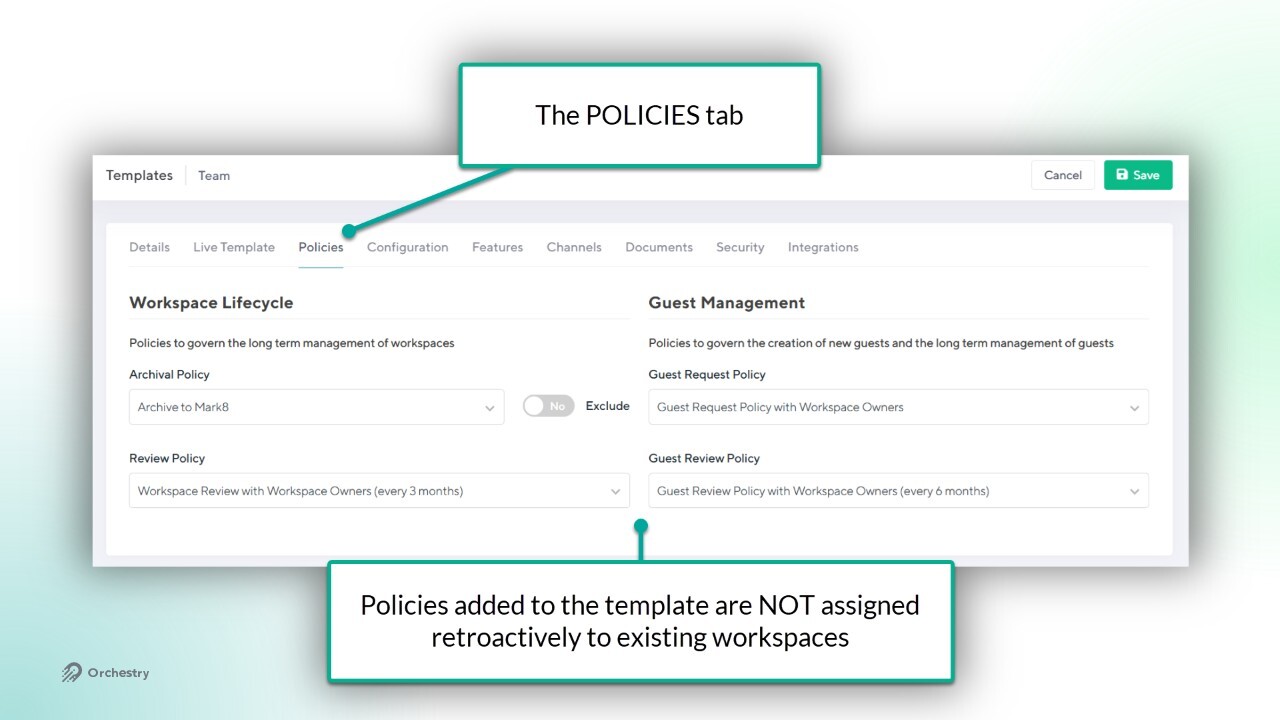
NOTE: Policies added to the workspace templates ARE NOT applied retroactively to existing workspaces. Only workspaces provisioned AFTER the change will include your policies.
The configuration options available on the 'Policies' tab will vary depending on the TEMPLATE TYPE. No fields are REQUIRED on the 'Policies' tab.
Configuration Tab
The 'Configuration' tab offers a mix of different configuration options, including NAMING POLICIES, METADATA, APPROVAL WORKFLOWS, and much more.
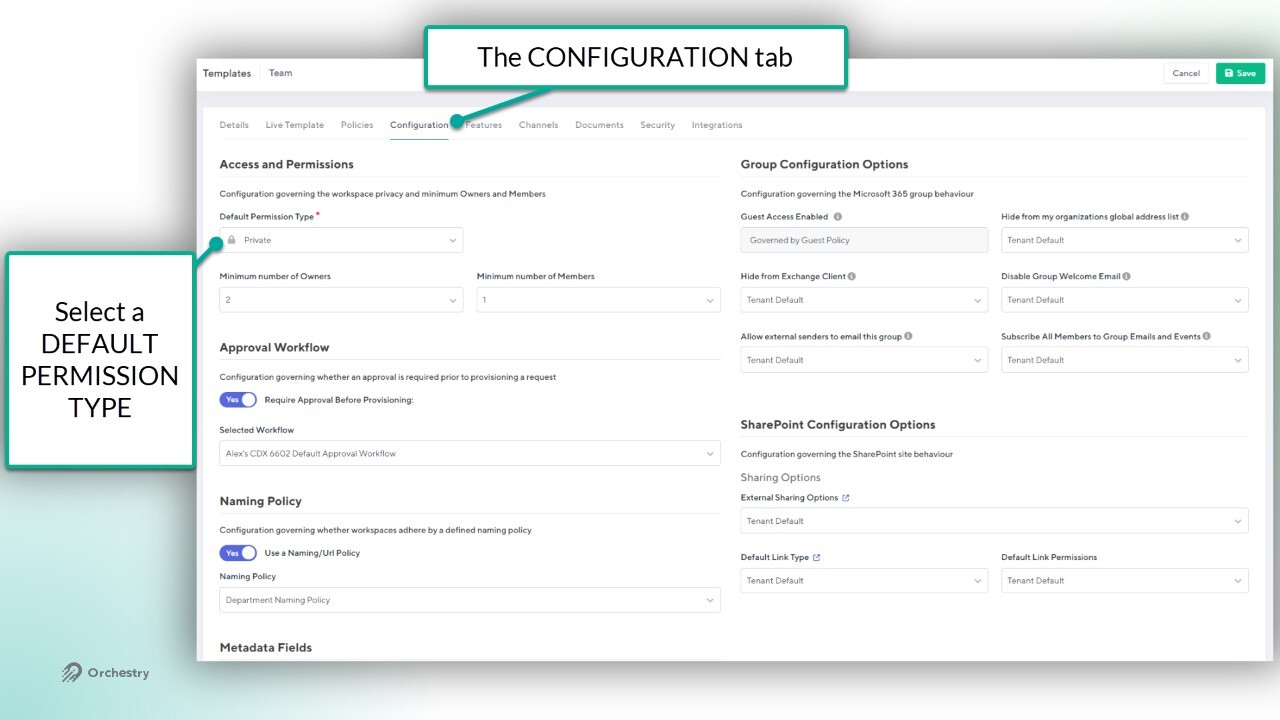
How to Configure the CONFIGURATION Tab:
Assign a DEFAULT PERMISSION TYPE (required)
Configure the default SENSITIVITY LABEL
Configure the MINIMUM OWNERS and MEMBERS
Add an APPROVAL WORKFLOW
Add a NAMING POLICY
Add METADATA
Configure GROUP SETTINGS
Configure SHAREPOINT SHARING OPTIONS
SAVE or move onto the next tab
Configuration Tab Fields:
FIELD NAME | DESCRIPTION |
Default Permission Type: | Configure workspace to be PRIVATE, PUBLIC, or USER CHOICE |
Sensitivity/Classification Label: | Choose a DEFAULT LABEL for the workspace, or allow USER CHOICE. Field is HIDDEN unless Sensitivity labels have been enabled and synced with Orchestry |
Minimum Owners and/or Members: | Configure the minimum owners and members needed to request a workspace |
Approval Workflow: | Select an workspace request APPROVAL workflow |
Naming Policy: | select a workspace NAMING policy |
Metadata: | Select ALL metadata, a SUBSET of metadata, or none at all. |
Guest Access: | Enable/disable guest access. This field is overrode by Guest Request policies and Sensitivity labels |
Hide from GAL: | Hides the group from the global address list |
Hide from Exchange Client: | Hides the group from Exchange |
Allow External Senders to email group: | Enable/disable the ability for external users to email the group inbox |
Subscribe all members to Group emails and events: | Disable to unsubscribe members from group emails and events |
External Sharing Options: | Configure if or how SharePoint files can be shared externally |
Default Link Type: | Change the default SHARE LINK type |
Default Link Permissions: | Change the default SHARE LINK permissions (EDIT or VIEW) |
Data Storage: | Choose a region for workspace data to be stored. Only applicable to multi-geo tenants. |
The Features, Channels and Documents Tabs
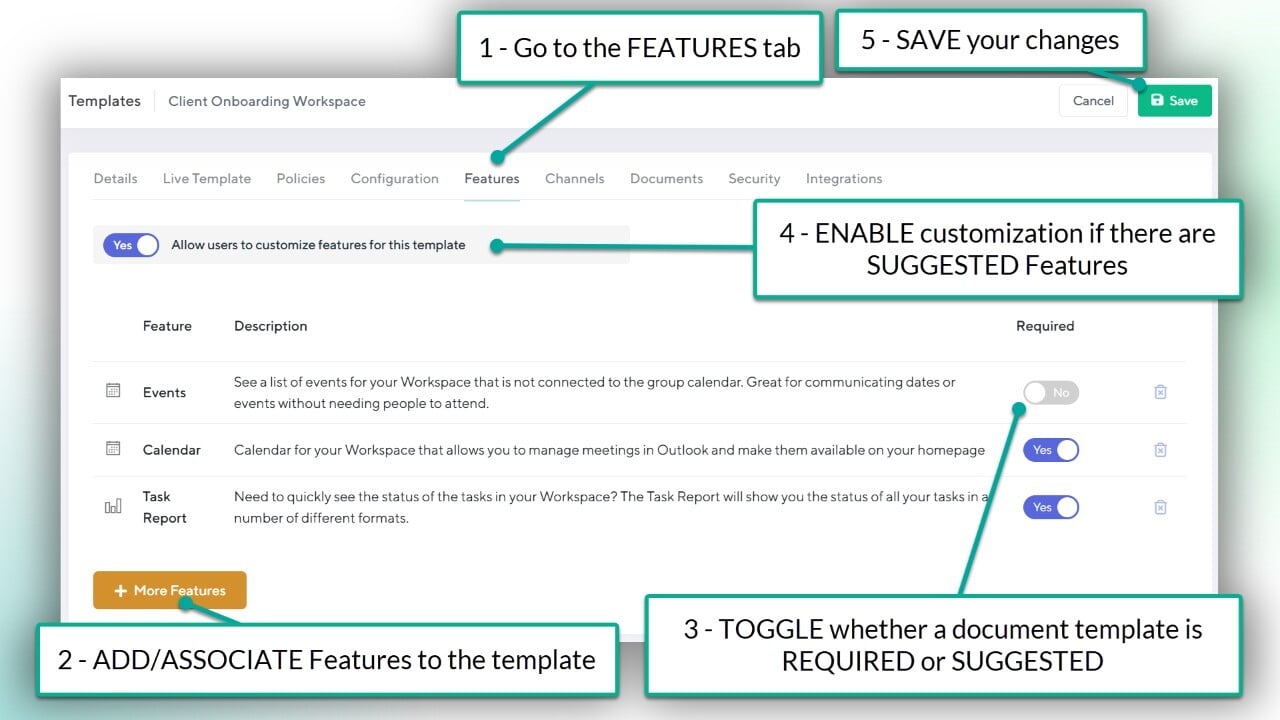
These three tabs allow Orchestry admins to customize the workspace template with Team channels, document templates and custom Features. When added, they are REQUIRED by default, but admins can set them to be SUGGESTED (optional) instead.
The Features Tab:
Navigate to the 'Features' tab
ADD Features to the workspace template
DISABLE the REQUIRED toggle on Features to make them optional
ENABLE/DISABLE the option to allow end users to add alternative Features
SAVE or move onto the next tab
Want to learn more about Features in Orchestry?
Check out the article: Features Overview
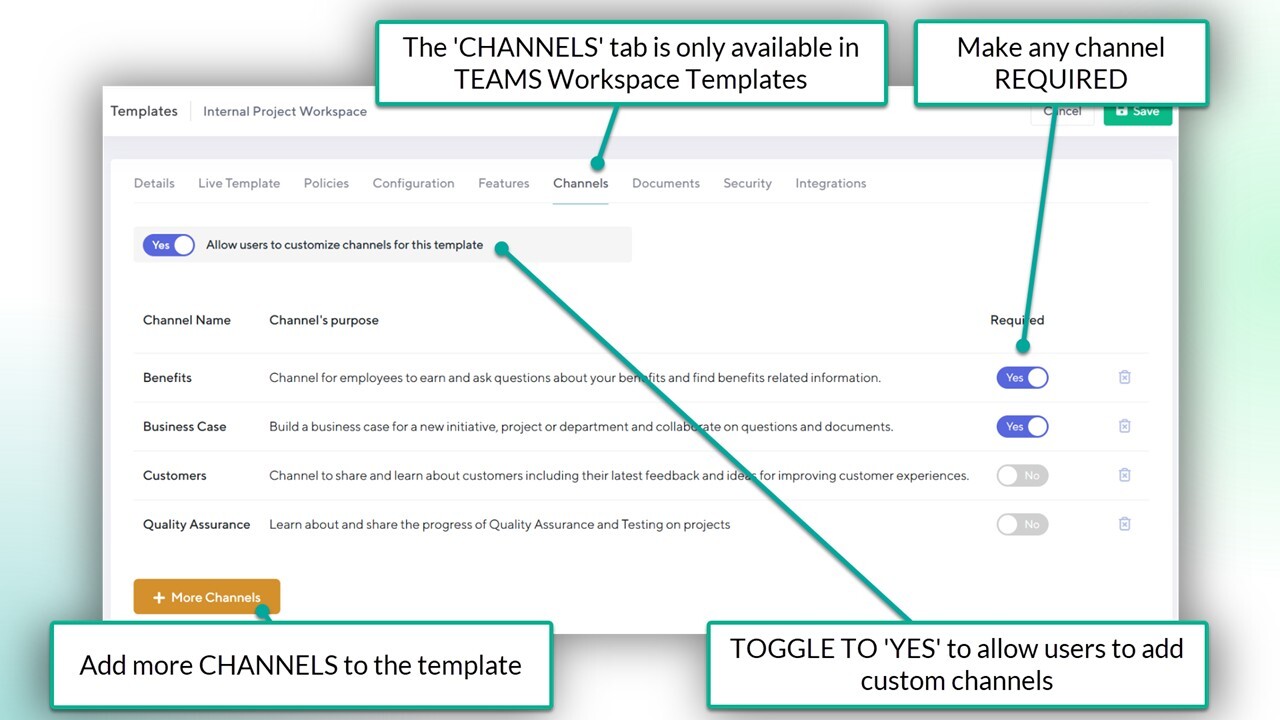
The Channels Tab:
Navigate to the 'Channels' tab
ADD channels to the workspace template
DISABLE the REQUIRED toggle to make channels optional
ENABLE/DISABLE the option to allow end users to add their own channels
SAVE or move onto the next tab
Want to learn more about Features in Orchestry?
Check out the article: Channels Overview
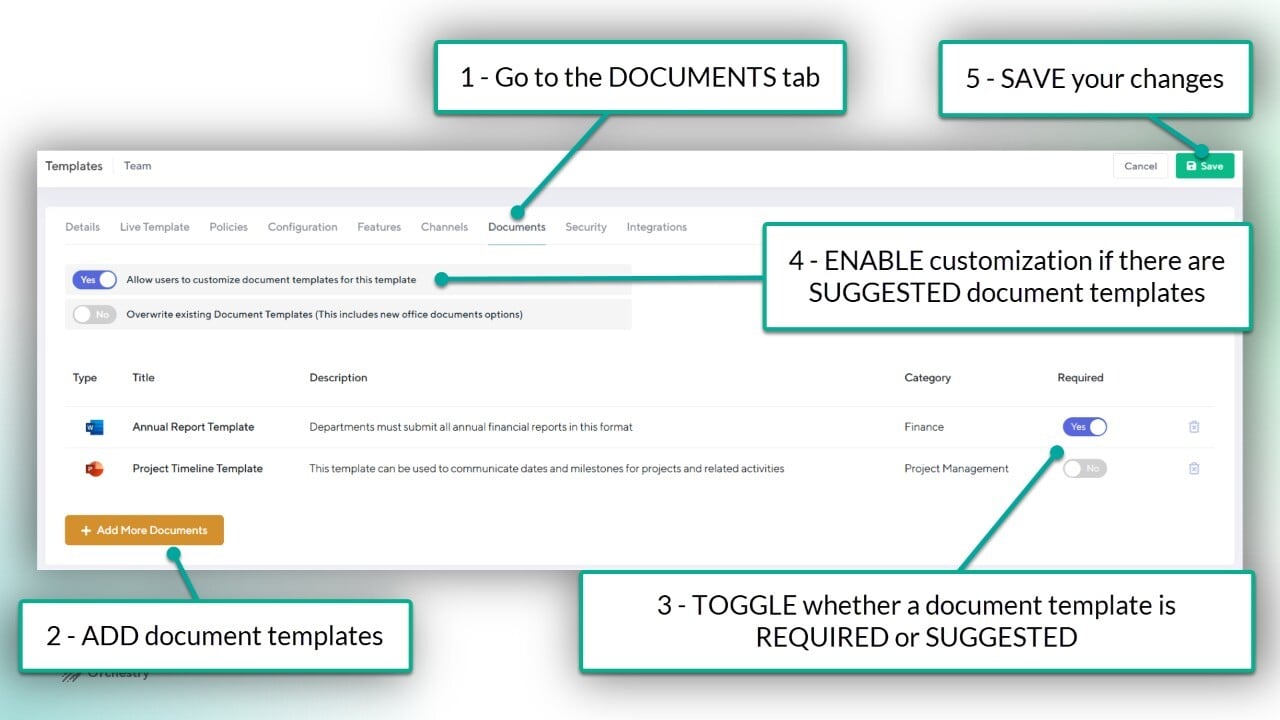
The Documents Tab:
Navigate to the 'Documents' tab
ADD documents to the workspace template
DISABLE the REQUIRED toggle to make documents optional
ENABLE/DISABLE the option to allow end users to add alternative documents
SAVE or move onto the next tab
Want to learn more about document templates in Orchestry?
Check out the article: Document Templates Overview
The 'Features', 'Channels' and 'Documents tabs are supported in most workspace templates. The 'Channels' tab is only supported in MS Teams workspace templates. Viva Engage workspace templates do not support any of them.

Security Tab
The 'Security' tab allows Orchestry admins to do two things:
Limit who can request workspaces from the template using SECURITY GROUPS (security trimming), and
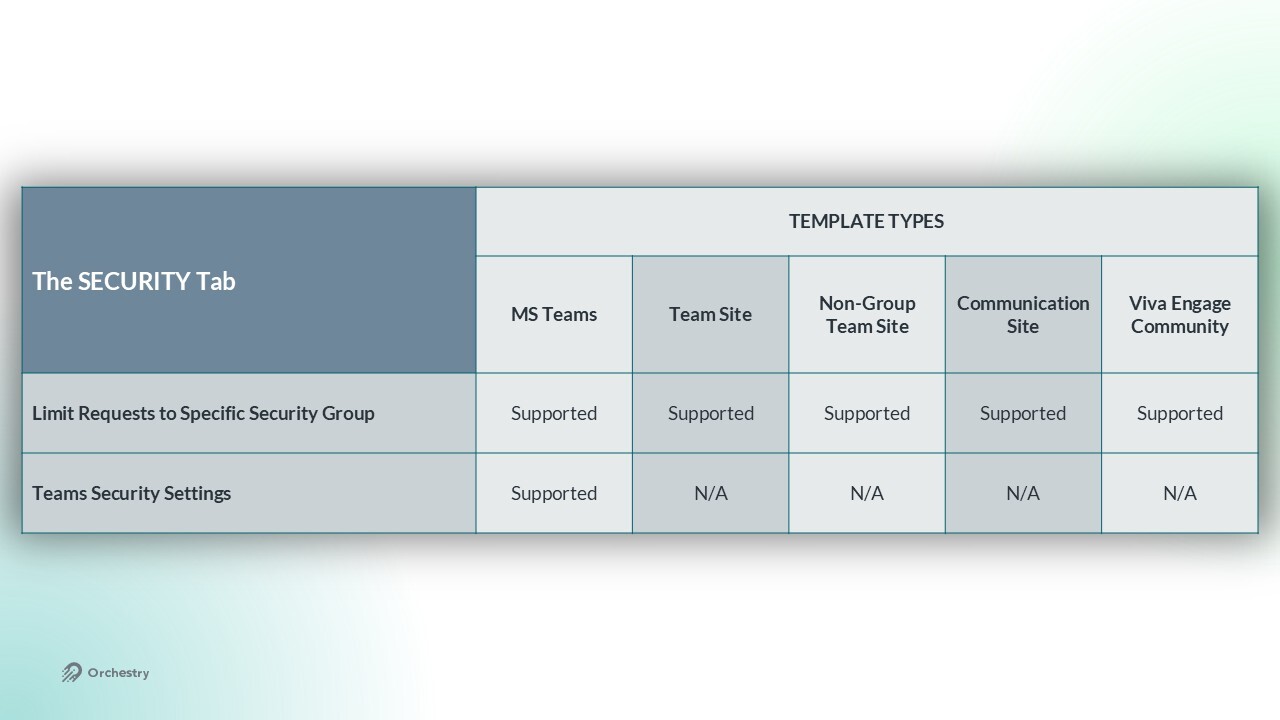
Setup MS Teams security settings. Only available in MS Teams workspace templates.
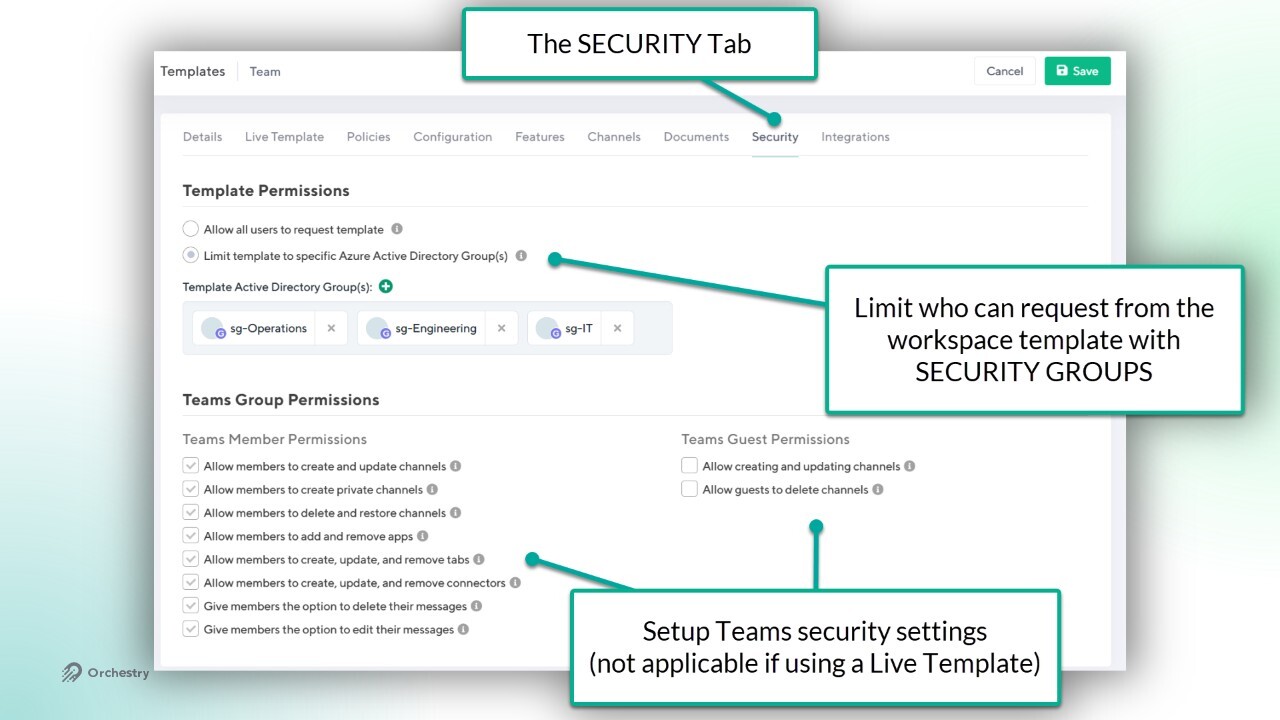
NOTE: The Teams security settings will be disabled if the workspace template is configured to use the settings from the LIVE TEMPLATE.
All workspace templates types support security trimming via SECURITY GROUP.
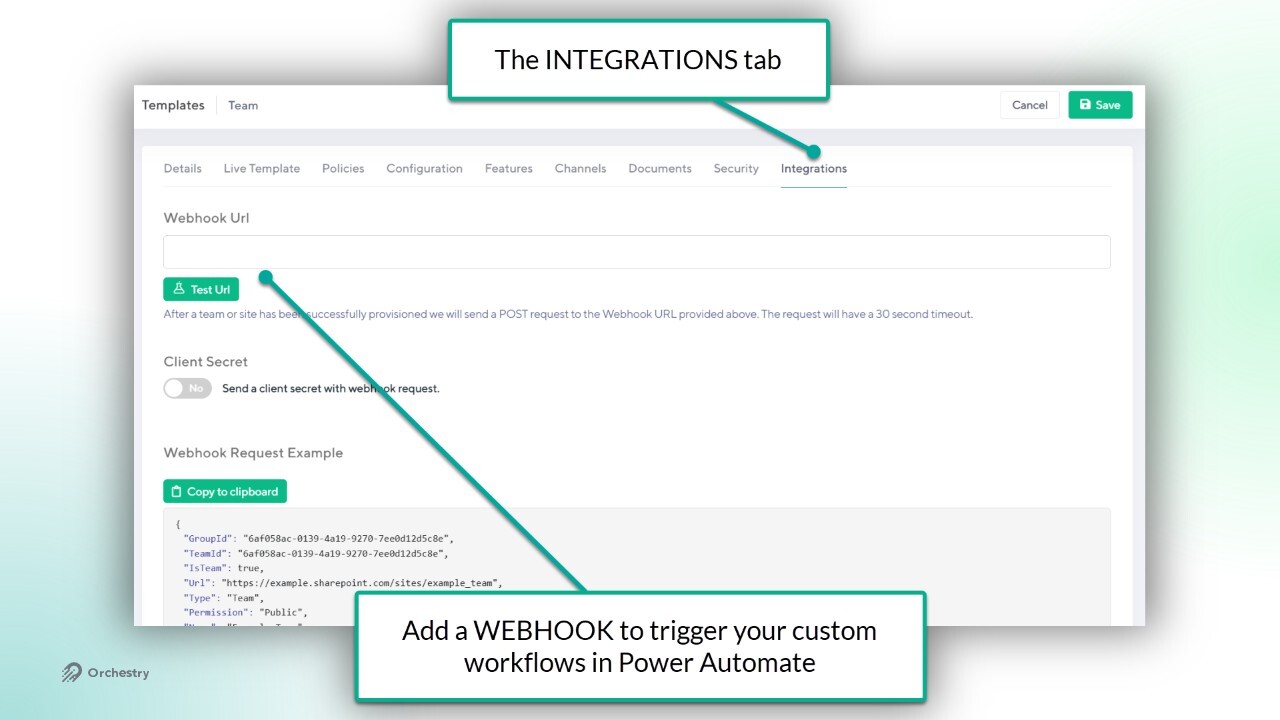
Integration Tab
The 'Integration' tab allows Orchestry admins to add a webhook to their template, expanding the provisioning job with a custom workflow using Orchestry's Provisioning API.
Want to learn more about Orchestry's Provisioning API?
Check out the article: Getting Started with the Provisioning API