How to Create a Workspace Review Policy
Last updated: June 11, 2026
Workspace Review policies help ensure your active workspaces stay compliant with your governance policies and goals. With periodic clean-up of version history from document libraries and group membership, you can proactively keep workspaces
These instructions will guide you through the setup of a fully-configured policy.
TIP: Many of the configurations in your workspace review are OPTIONAL and do not need to be enabled in every policy you create.
Starting a New Policy
Go to the Workspace Reviews page (Lifecycle Management > Workspace Reviews)
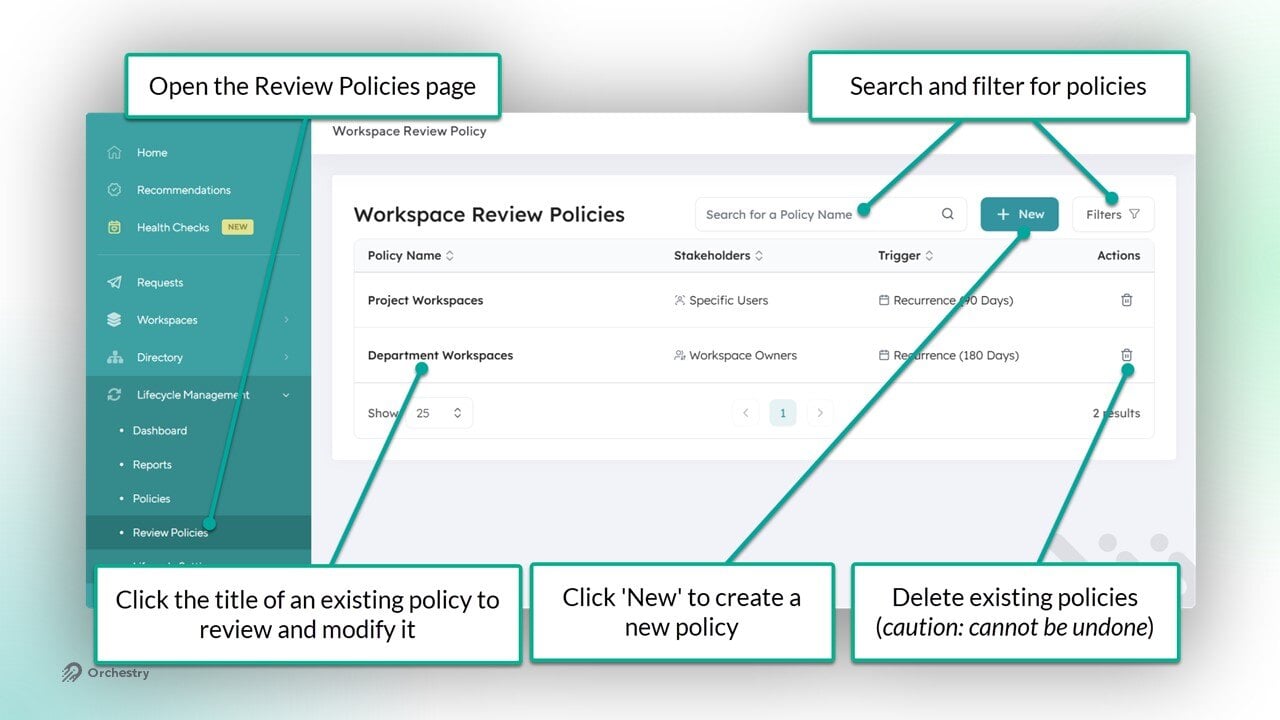
Click the NEW button to start a new policy
On the NAME tab, give your policy a name and description

How to Configure the Workspace Review Policy Actions
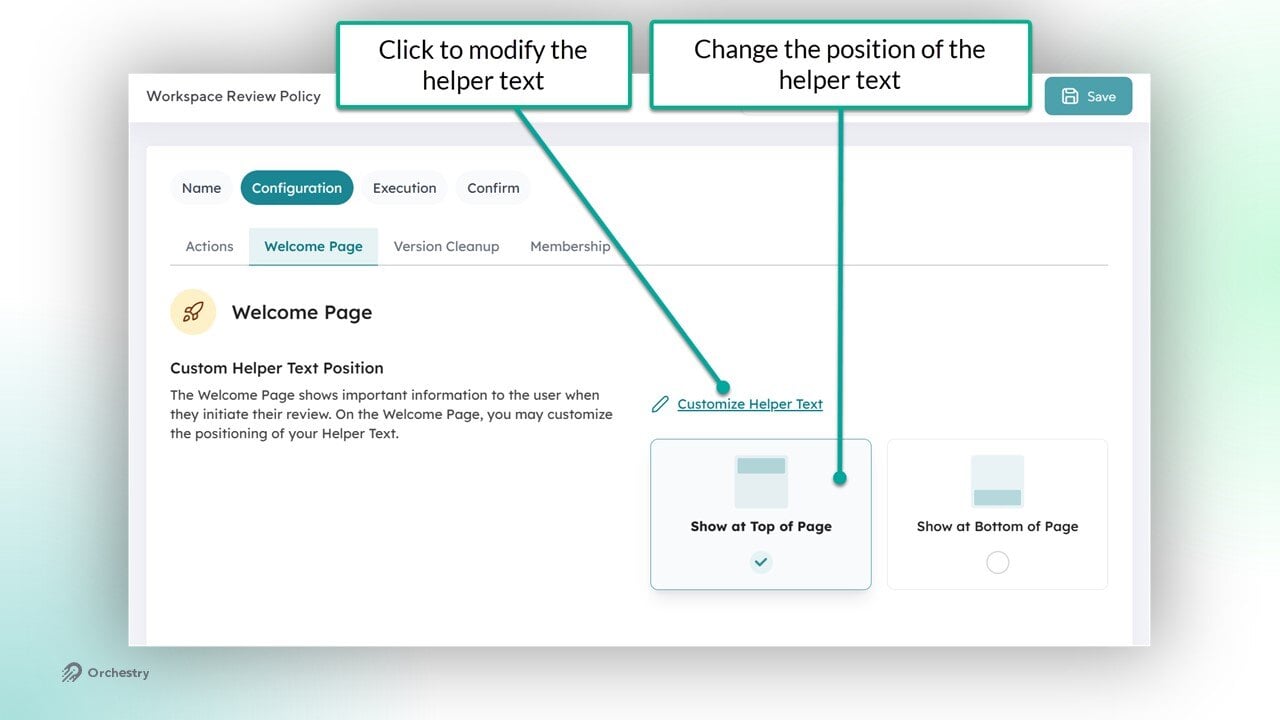
The Actions and Welcome Tabs
Open the 'Configuration' tab

On the Actions tab, choose the actions to you want this policy to perform. Each selected action will be configured on its own tab
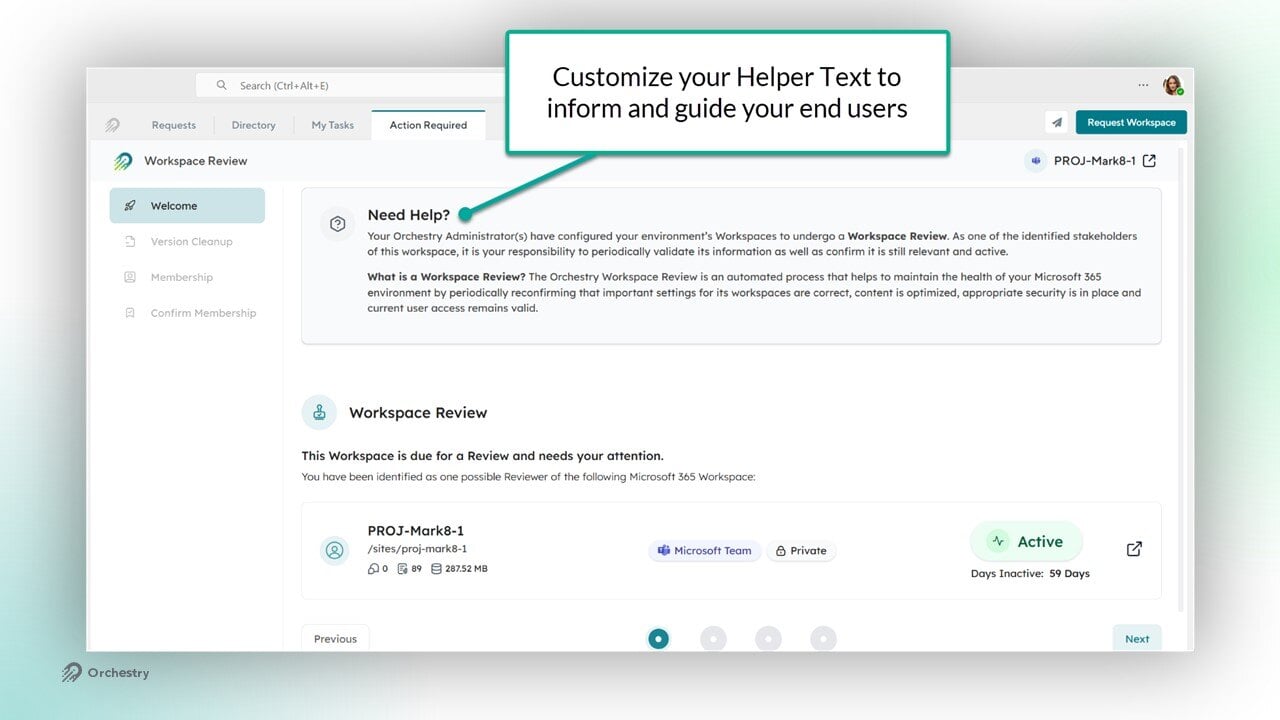
On the Welcome tab, customize the helper text that will be used by your end users
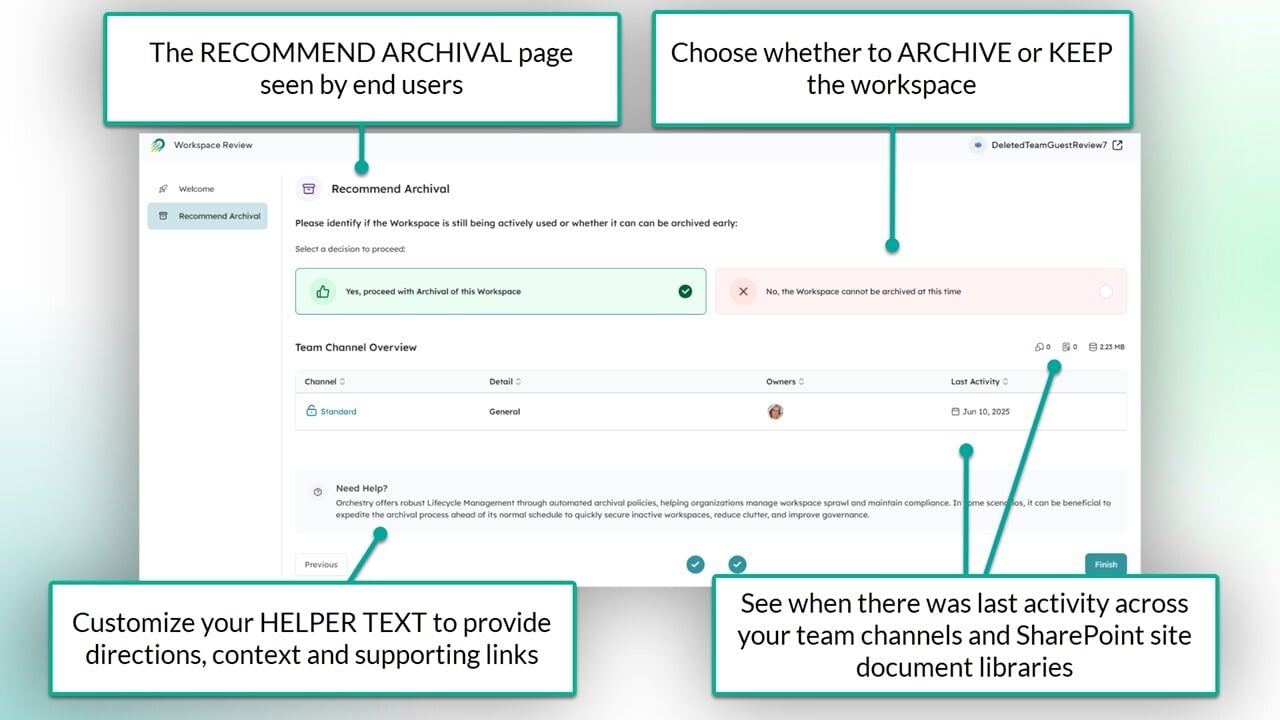
Here is what the end-user experience looks like:
NOTE: The Welcome tab cannot be disabled in these policies.
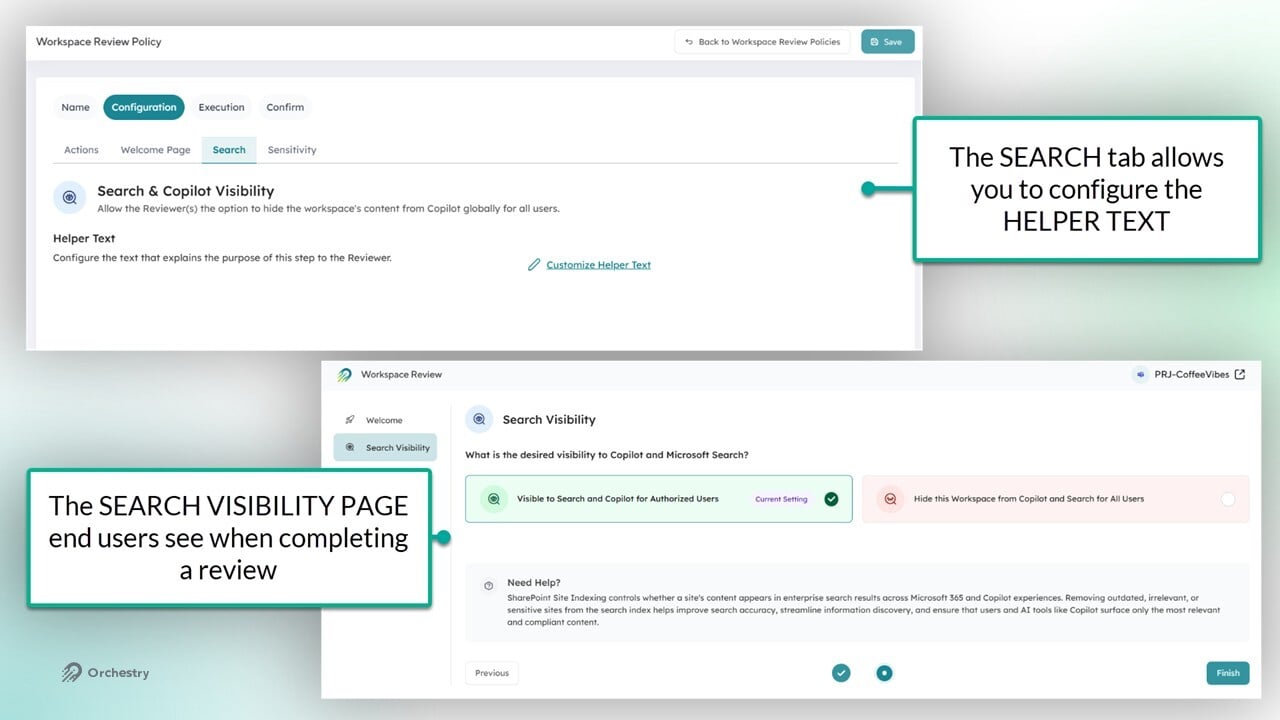
Policy Actions - Search and Copilot
Open the 'Sensitivity' tab
Review and modify the helper text for this section
The Search tab does not require any additional configuration settings beyond the helper text.
Policy Actions - Validate Sensitivity Labels
Open the 'Sensitivity' tab
Review and modify the helper text for this section
Choose the appropriate method for assigning Sensitivity labels: Enforce from Associated Workspace Template Label(s), Enforce Specific Label, or Ask Reviewer to Choose
VALIDATE SENSITIVITY LABELS - Enforce from Associated Workspace Template Label(s)
This option helps ensure all workspaces created from the same Workspace template also share the same Sensitivity label(s).
By selecting this option, you must also configure how to handle workspaces that weren't created from a Workspace template, or templates that do not have a Sensitivity label assigned to them.

VALIDATE SENSITIVITY LABELS - Enforce Specific Label
This option allows you to choose the exact label that should be assigned to all workspaces the Workspace Review policy is assigned to.
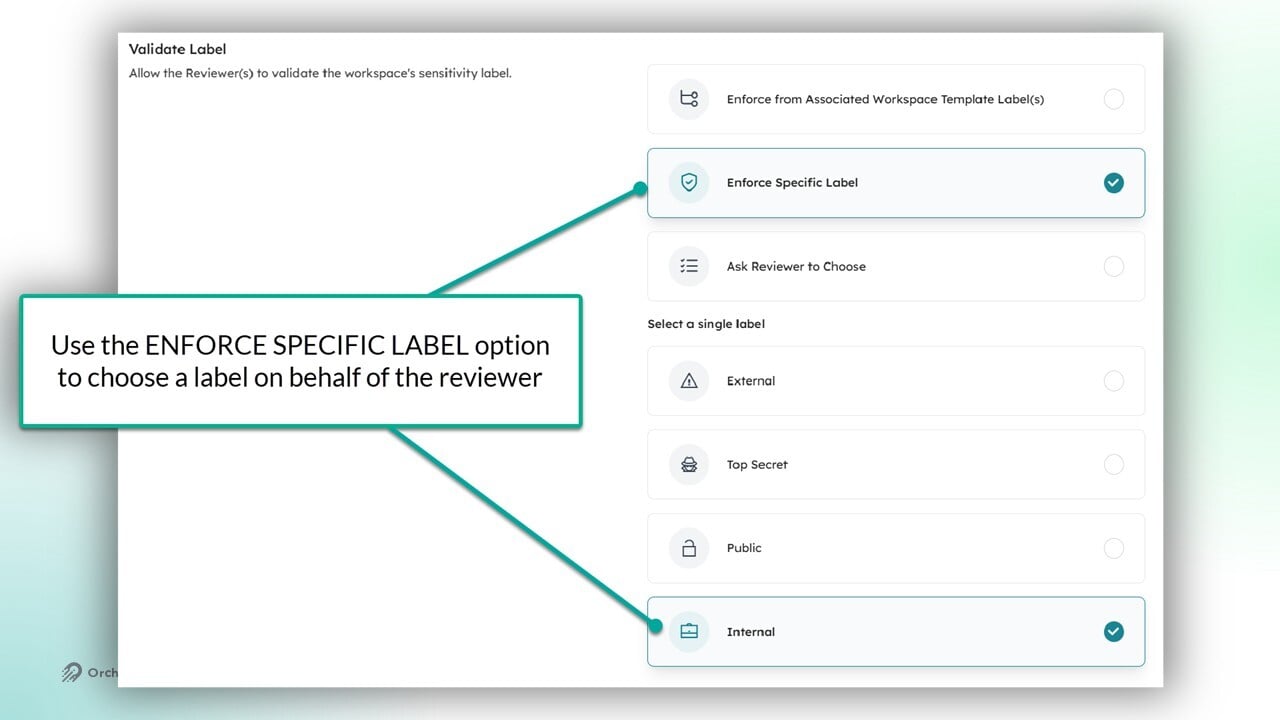
NOTE: With this configuration, the reviewer will not see the 'Sensitivity Configuration' page.
VALIDATE SENSITIVITY LABELS - Ask Reviewer to Choose
This option allows reviewers to select from a list of Sensitivity labels to apply to their workspace. You must provide a minimum of two labels for them to choose from.
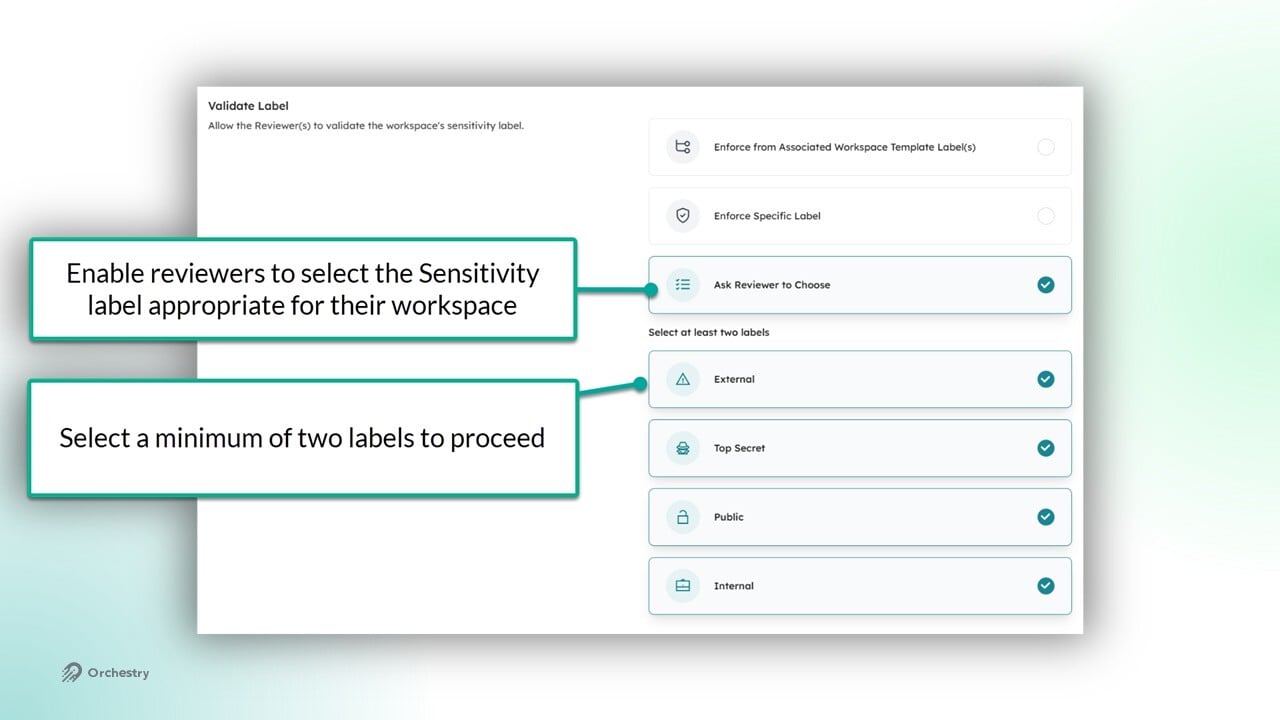
TIP: Configure the HELPER TEXT to provide users with the information they need to make a choice.
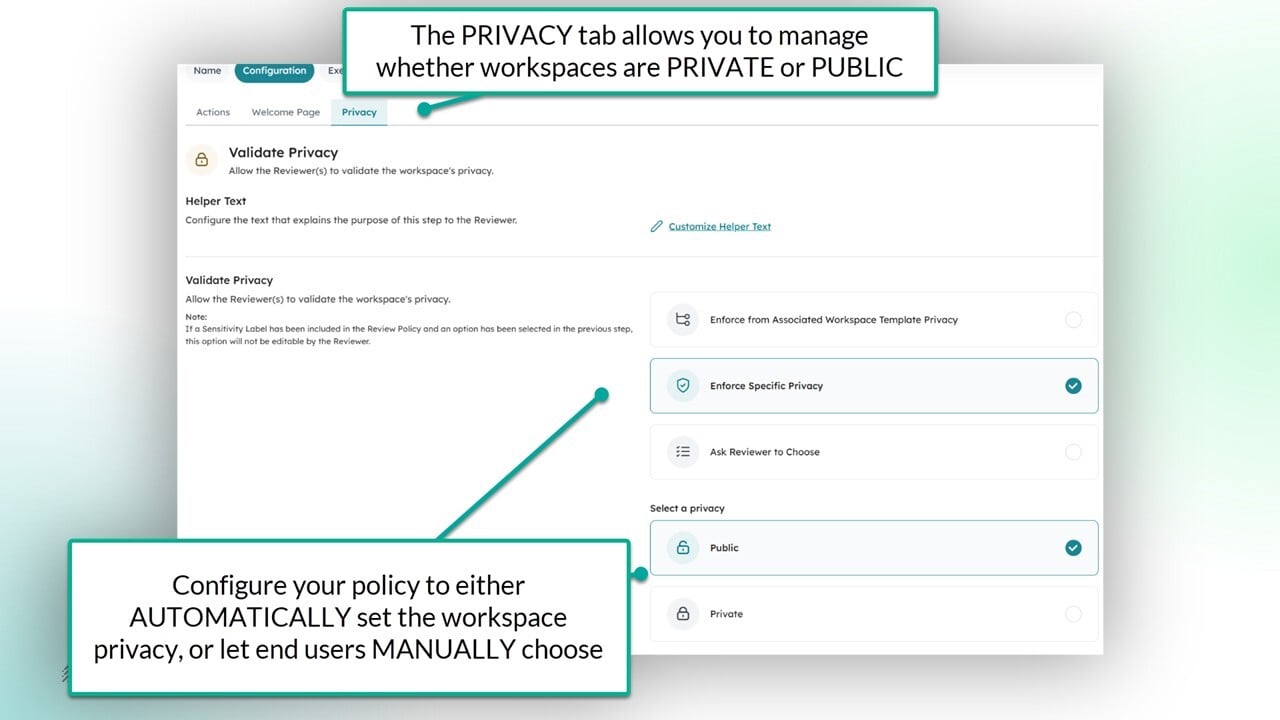
Policy Actions - Validate Privacy
Open the 'Privacy' tab
Review and modify the helper text for this section
Choose the appropriate method for managing the workspace privacy configuration: Enforce from Associated Workspace Template Label(s), Enforce Specific Privacy, or Ask Reviewer to Choose
TIP: If your workspaces are already governed by a container-level Sensitivity label that controls their PRIVACY settings, refrain from enabling this tab. Orchestry will not override Sensitivity labels.
VALIDATE PRIVACY - Enforce from Associated Workspace Template Label(s)
Similar to the 'Sensitivity' tab, the 'Privacy' tab enables you to use the workspace template as the basis for privacy settings.

This option must also be configured to handle workspaces that are NOT ASSOCIATED to a workspace template, such as workspaces created outside of Orchestry.
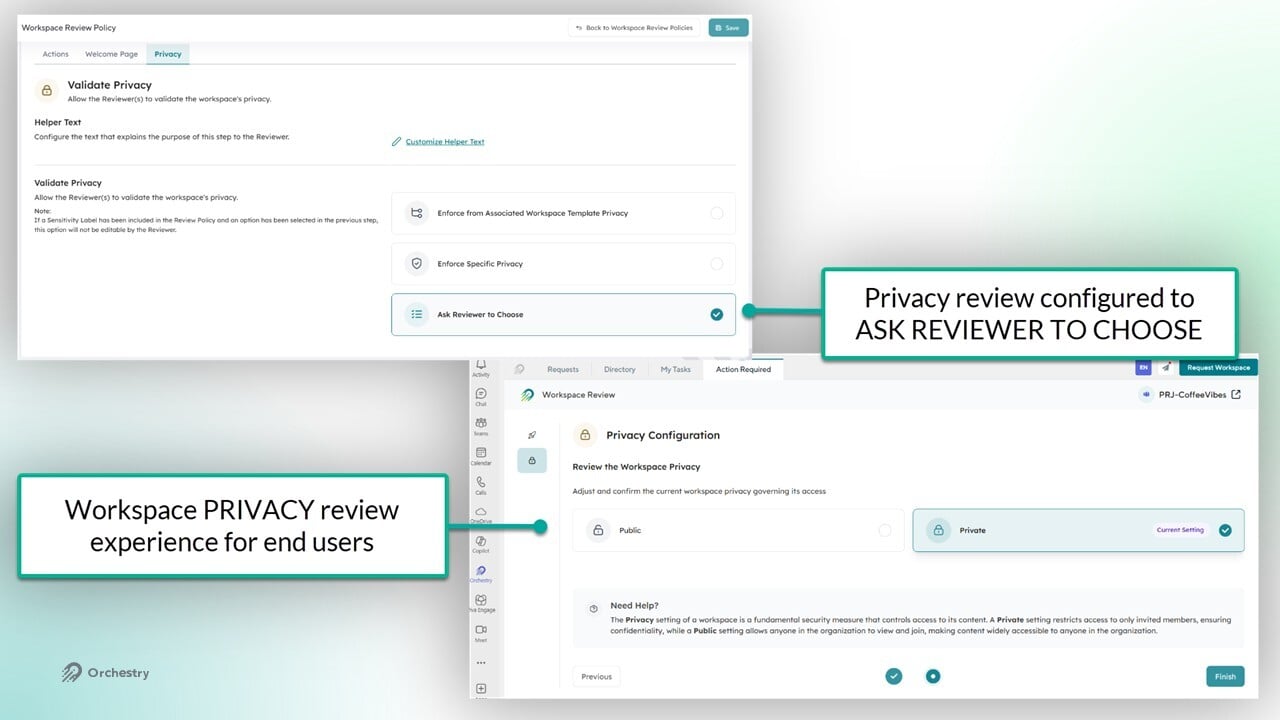
VALIDATE PRIVACY - Ask Reviewer to Choose
For more flexibility, you can allow your workspace owners to make their own choice. This option adds the 'Privacy Configuration' page to the actual review seen by end users.
Configure the Policy Actions - Recommend Archival
Enabling the 'Recommended Archival' tab of your Workspace Review policies gives your end users the option to archive a workspace if it's no longer needed.
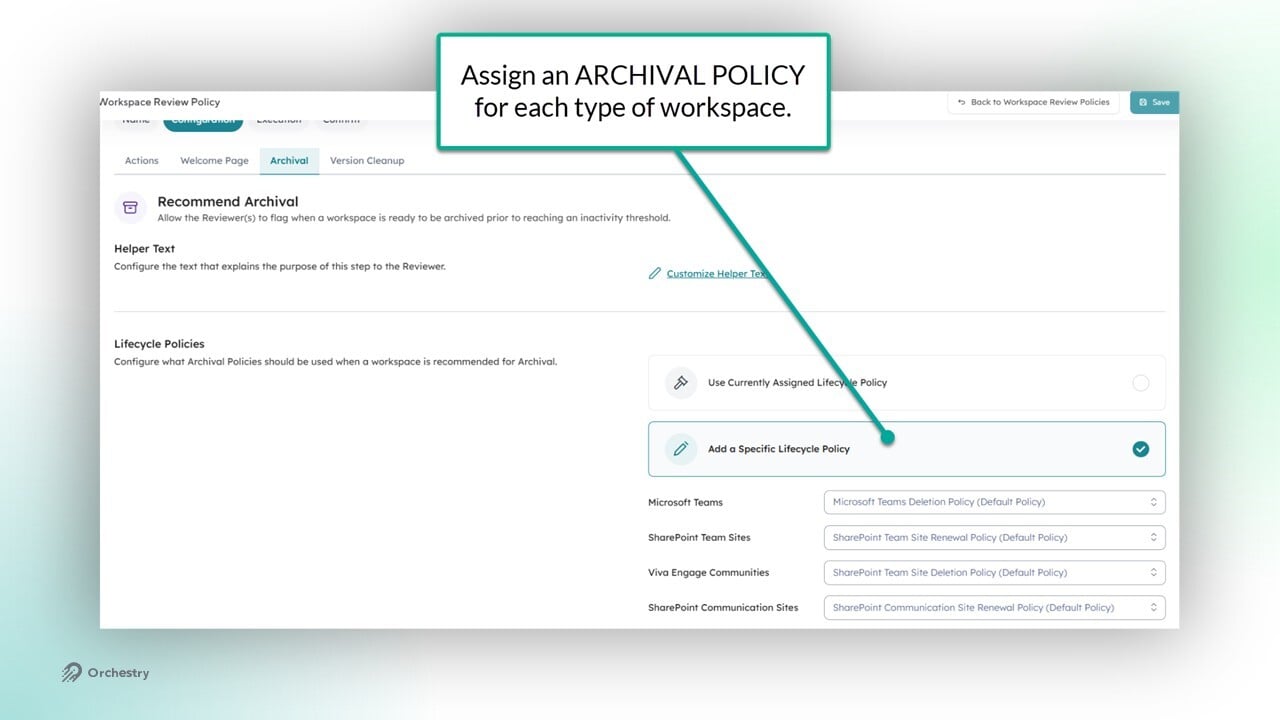
RECOMMEND ARCHIVAL - Add a Specific Lifecycle Policy
When configuring the 'Workspace Archival' tab in the policy, you choose which Archival (lifecycle) policies are used for different types of workspaces. For example, you can set the Workspace Review policy to use specific Archival policies for each workspace type.
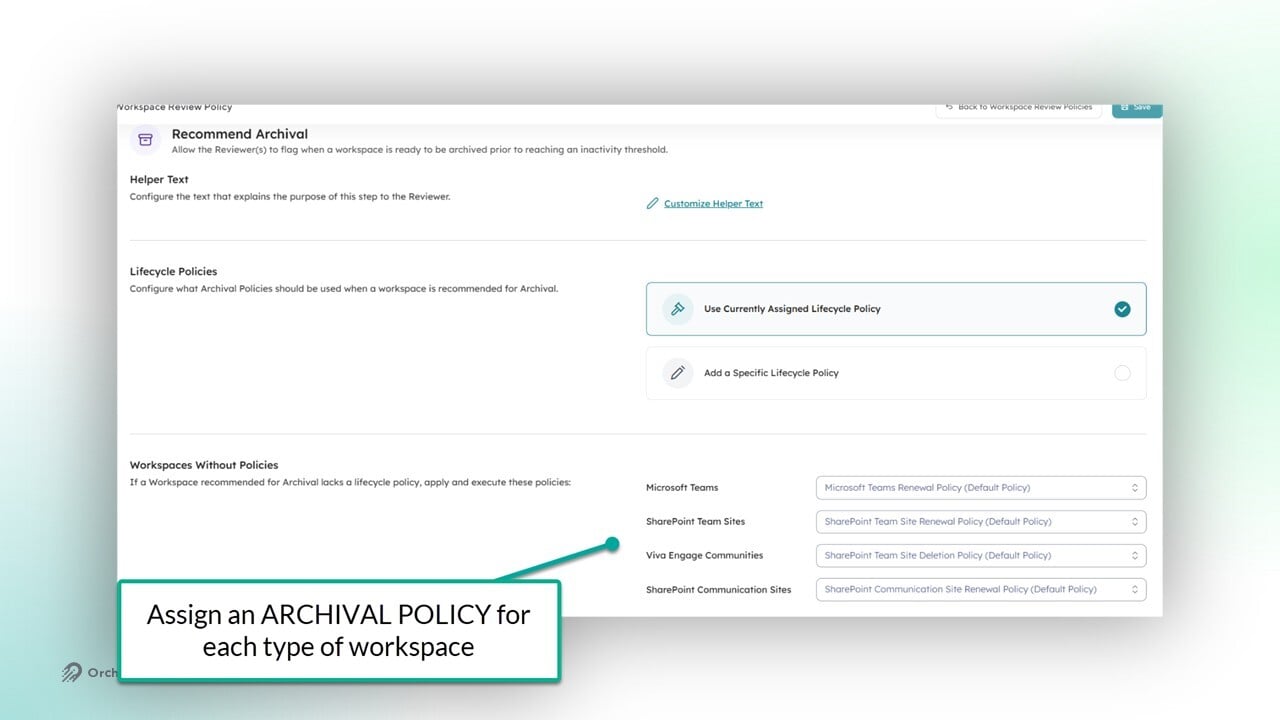
RECOMMEND ARCHIVAL - Use Currently Assigned Lifecycle Policy
If you apply the "Use Currently Assigned Lifecycle Policy" option to your policy. If the end user chooses to archive the workspace, it will use whatever policy is already assigned.
Additionally, this configuration will add the "Workspaces without Policies" section. Here, you can assign an archival policy for each type of workspace.
NOTE: End users will NOT see the 'Recommended Archival' page if (1) the workspace does not have an Archival policy assigned to it, and (2) the policy is not configured to handle workspaces without Archival policies.
Policy Actions - Version Cleanup
Please note that purged version history bypasses the site recycle bin and are permanently deleted.
Open the 'Version Cleanup' tab
Review and modify the helper text for this section
Enable 'One-time Clean Up' to offer users the ability to wipe version history from their SharePoint site document libraries immediately after completing the review
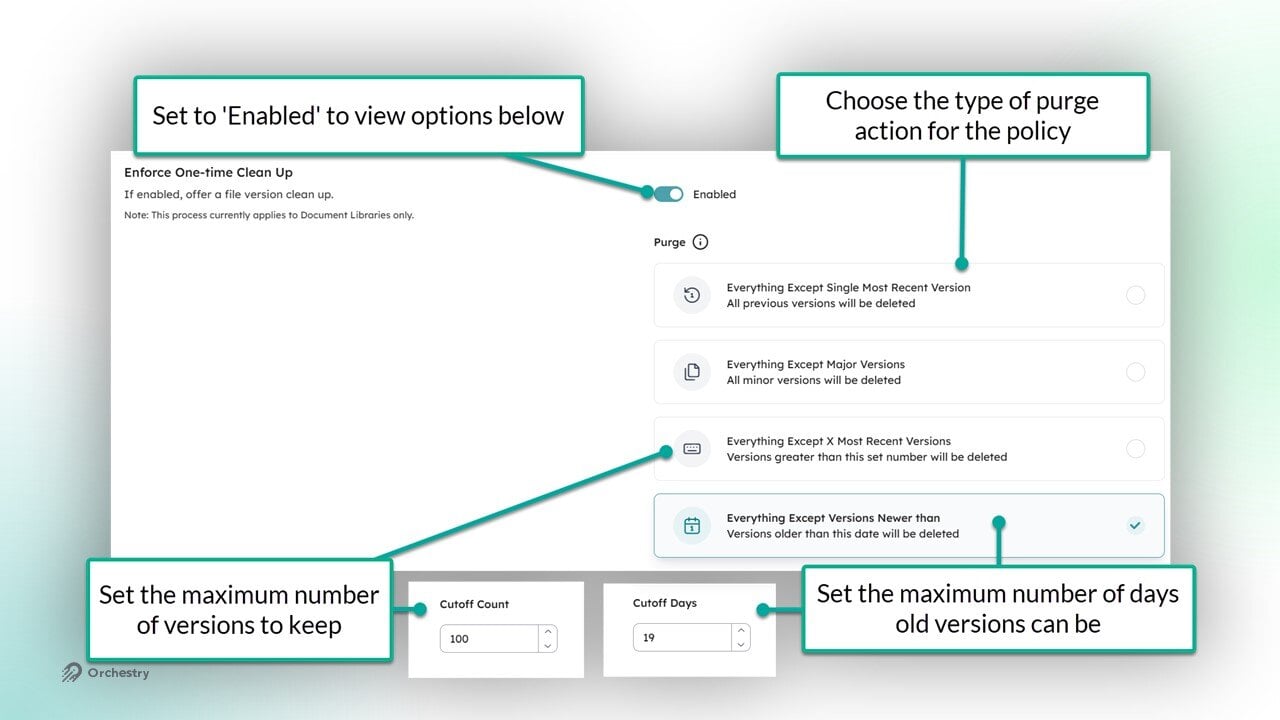
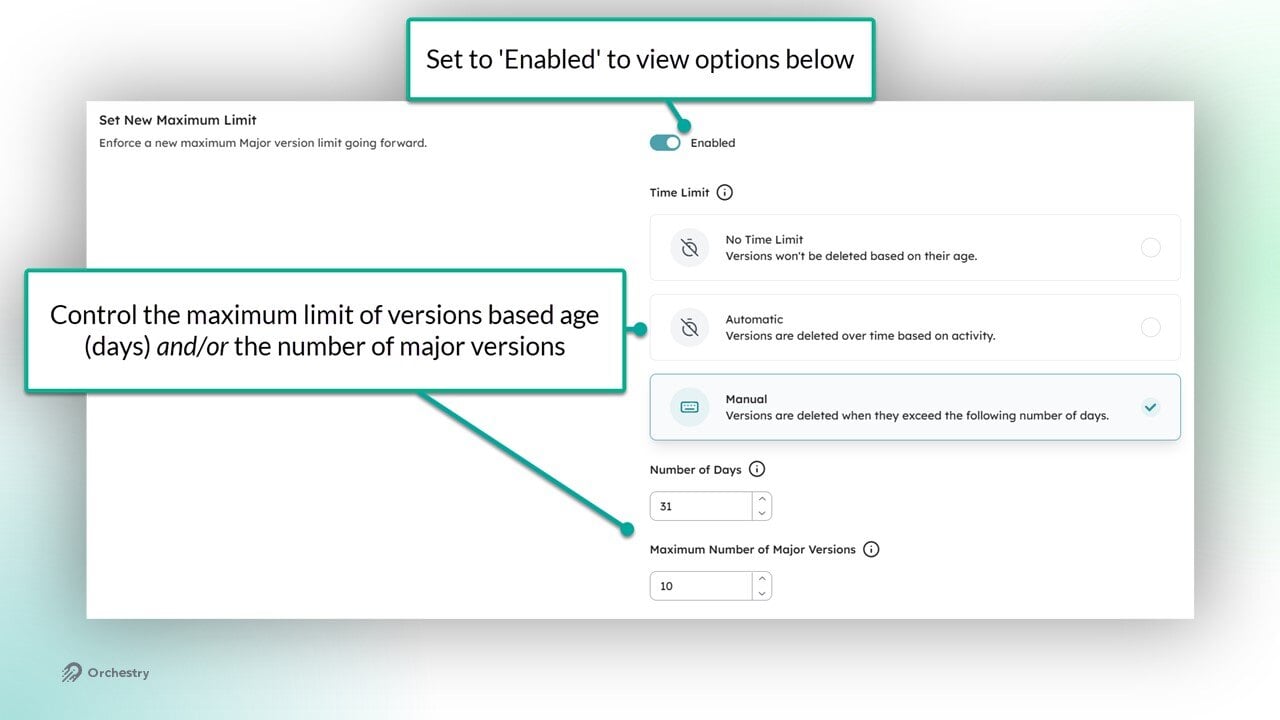
Enable 'Set New Maximum Limit' to automatically limit the number of major versions allowed in document libraries moving forward
Enable 'Skippable Libraries' to allow reviewers to choose which document libraries should be exempt from version purging
Enable 'Skippable Step' to allow reviewers to skip this step entirely
NOTE: the MANUAL configuration requires a minimum of 30 days
Policy Actions - The Membership Tab
Open the 'Membership' tab
Review and modify the helper text for this section
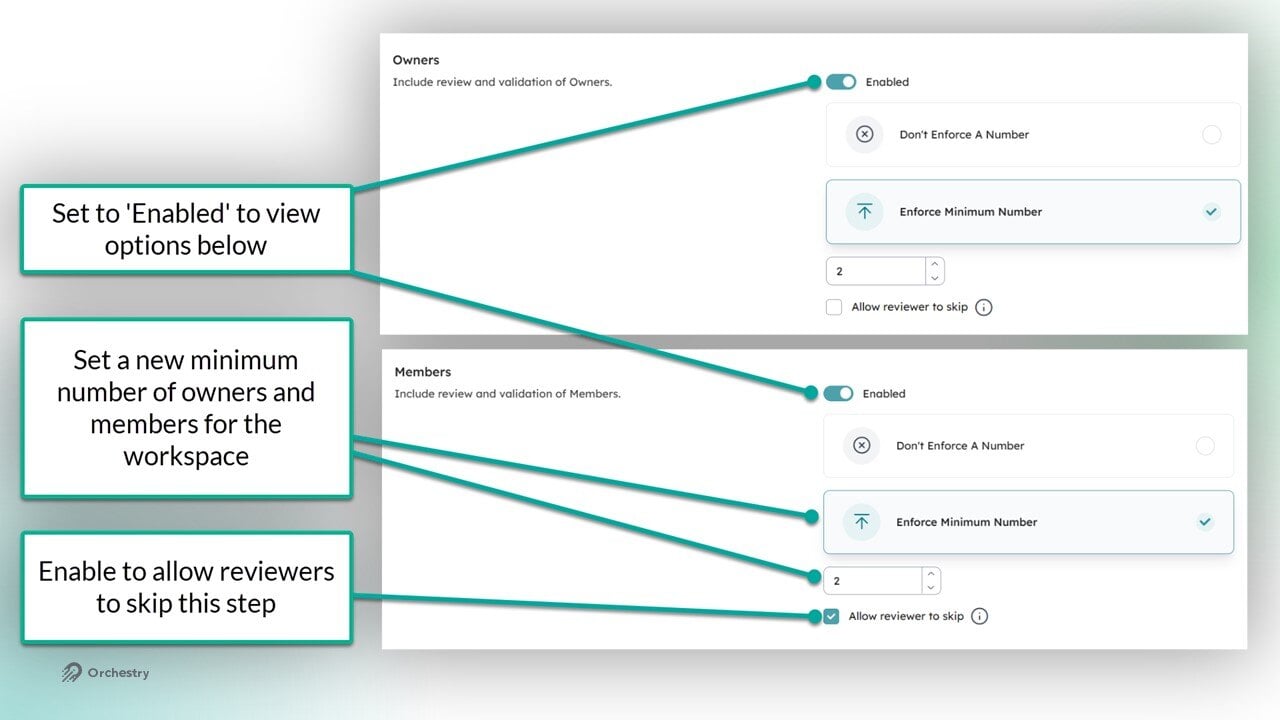
Enable a new/updated requirement for minimum owners and members
Enable the review of Guest in the workspace. This works identically to existing Guest Review policies
Policy Actions - The Sharing Links Tab
This option allows workspace owners to delete share links from their workspace's SharePoint Document Libraries.
Open the 'Sharing Links' tab
Review and modify the helper text for this section
Enable at least ONE 'Smart Action' method
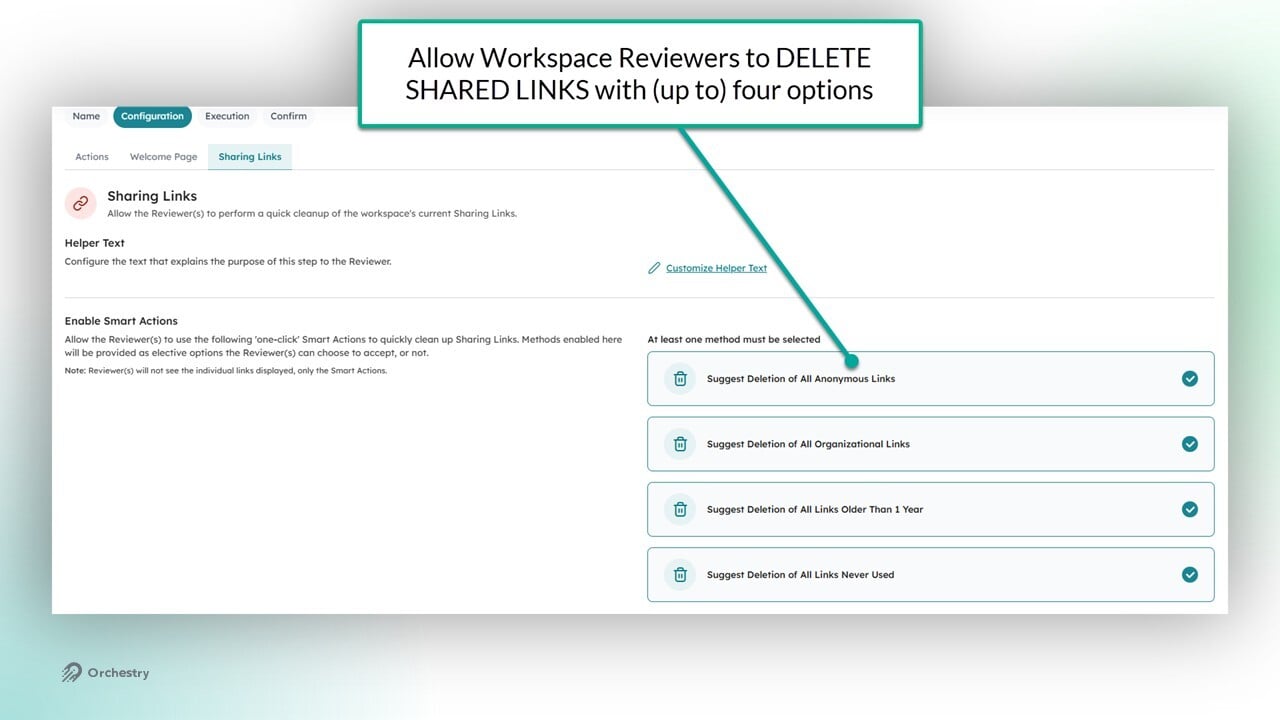
NOTE: Reviewers will NOT be able to view the list of share links when completing the policy.
Policy Actions - The Metadata Tab
This option allows reviewers to validate or assign new Orchestry metadata to their workspaces.
Open the 'Metadata' tab
Review and modify the helper text for this section
Select whether the policy will leverage the metadata assigned to the ASSOCIATED WORKSPACE TEMPLATE, or SPECIFIC METADATA of your choice
NOTE: Reviewers will NOT be able to assign metadata to any workspace that has not been added to the Orchestry Directory.
To learn more, check out the article: Configuring the Workspace Directory
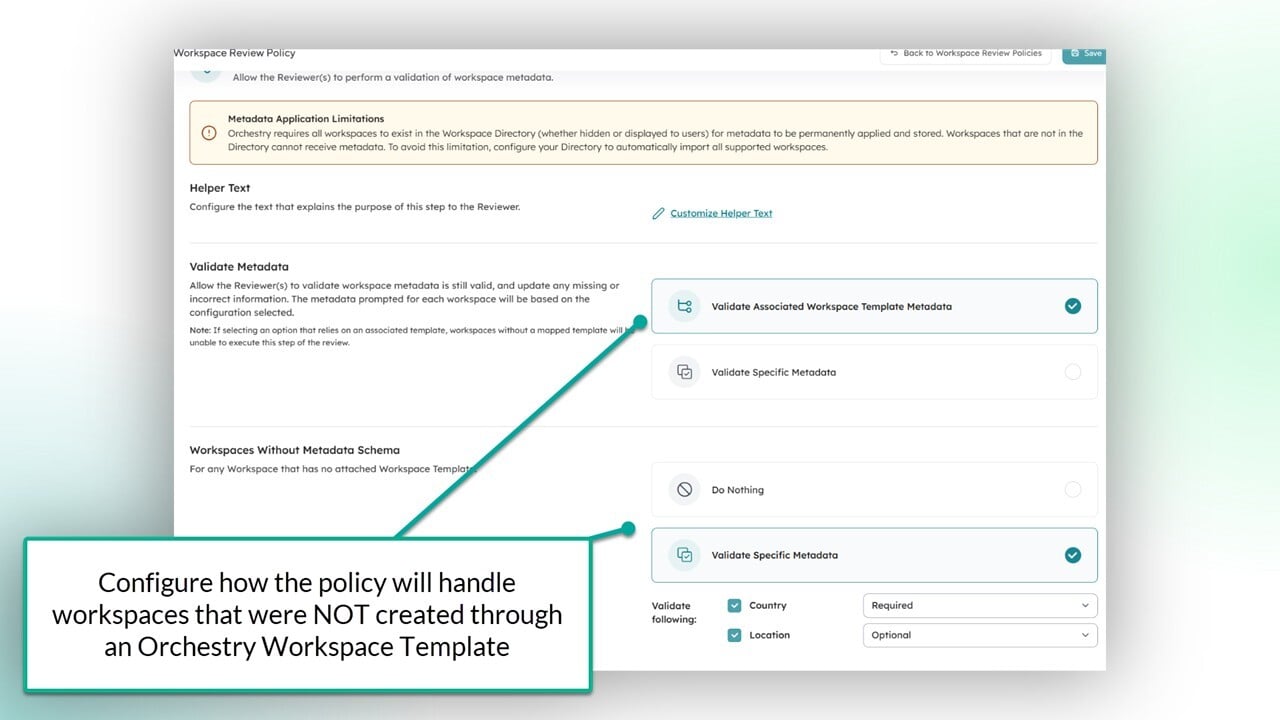
If you choose "VALIDATE ASSOCIATED WORKSPACE TEMPLATE METADATA", then you can configure this policy to handle workspaces that were created without an Orchestry Workspace Template. In these scenarios, the policy can either:
Do nothing (skips step for end user), or
offer SPECIFIC metadata chosen by you
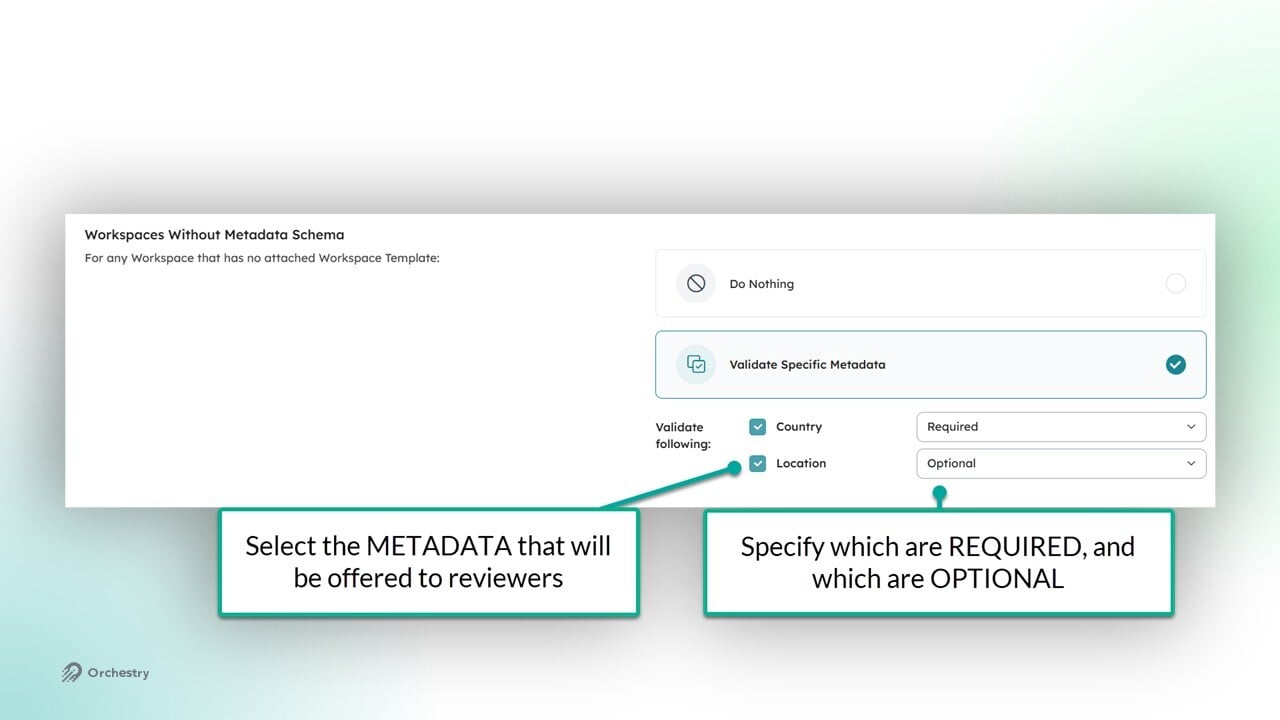
If you choose VALIDATE SPECIFIC METADATA as the primary method, you can:
Select which metadata to offer reviewers assigned this policy,
Configure which options are REQUIRED or OPTIONAL
Configure the Policy Execution
Open the 'Execution' tab. Here, you can configure the recurrence of the policy, define your stakeholders, define notification cadence, define your escalation rules and cancellation rules.
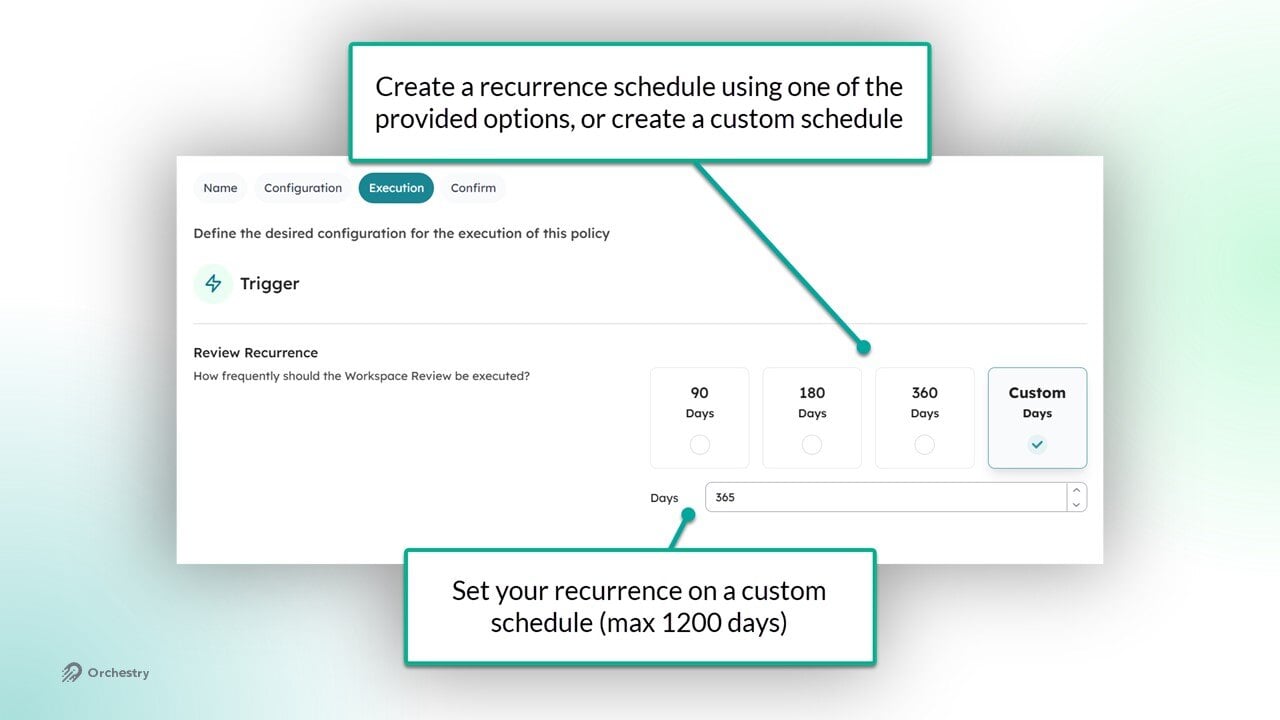
Define the review recurrence schedule. The minimum number of days is 90, and the maximum is 1200 (over three years)
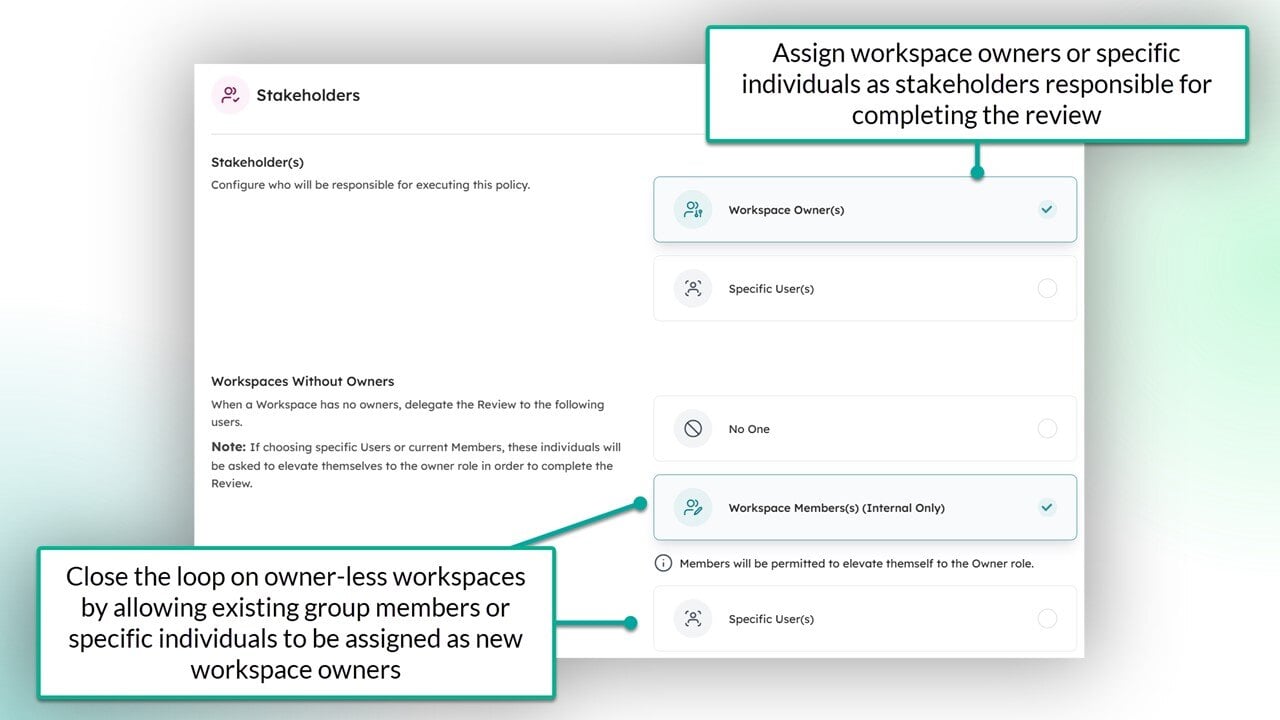
Define your stakeholders. You can delegate the execution of the policy to workspace owners, or assign specific individuals to complete it on their behalf.
Define how to handle workspaces without owners. The policy can be configured to allow existing members to promote themselves or you can assign specific individuals to take-over.
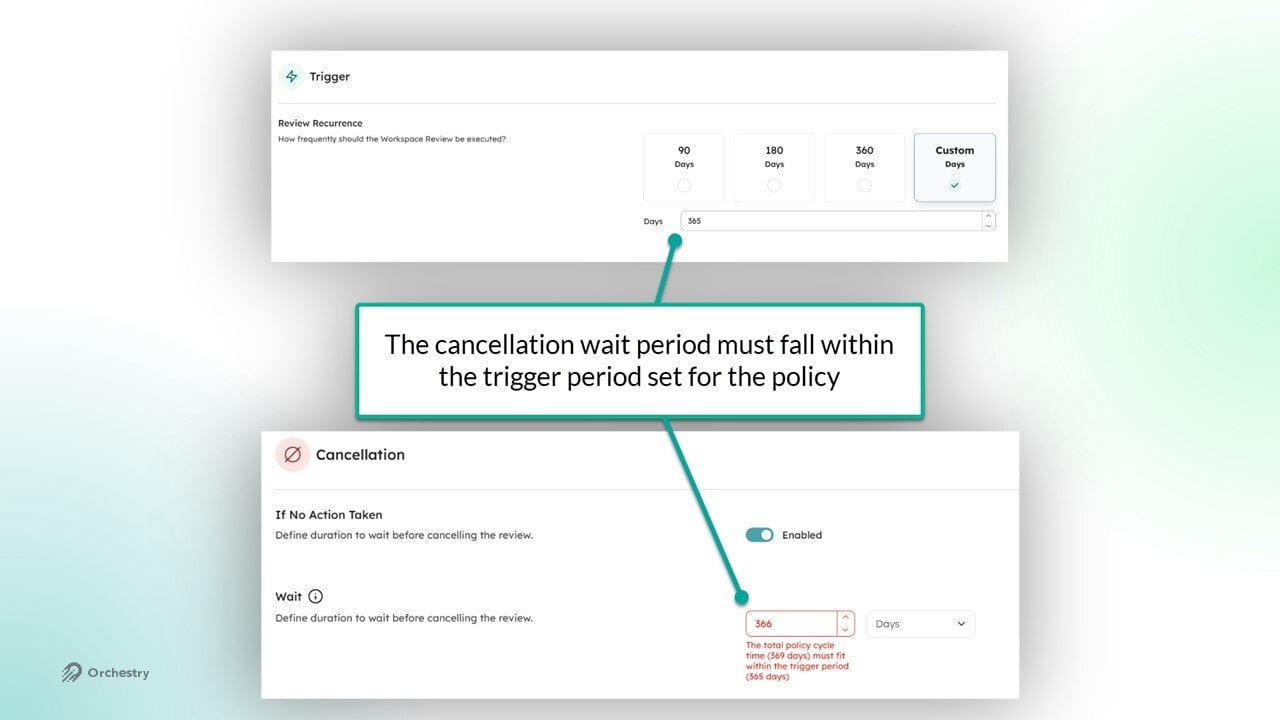
Define when to cancel incomplete reviews. This helps close the loop on reviews that will not be actioned.
NOTE: The total elapsed time for notifications, the optional escalation wait period and the optional cancellation wait period (days/months) must fall within the review period you set at the top of the page.
NOTE: Cancelled workspace reviews do not affect the recurrence schedule defined in the review policy. The policy will continue to trigger future reviews based on the original execution date for each workspace.
Review and Save the Policy
Open the 'CONFIRM' page. This page summarized the configurations you've enabled in this policy.
Review your configuration. Ensure everything you want the policy to do is enabled and ready to go.
SAVE your changes. This will close the policy and return you to the Workspace Reviews page
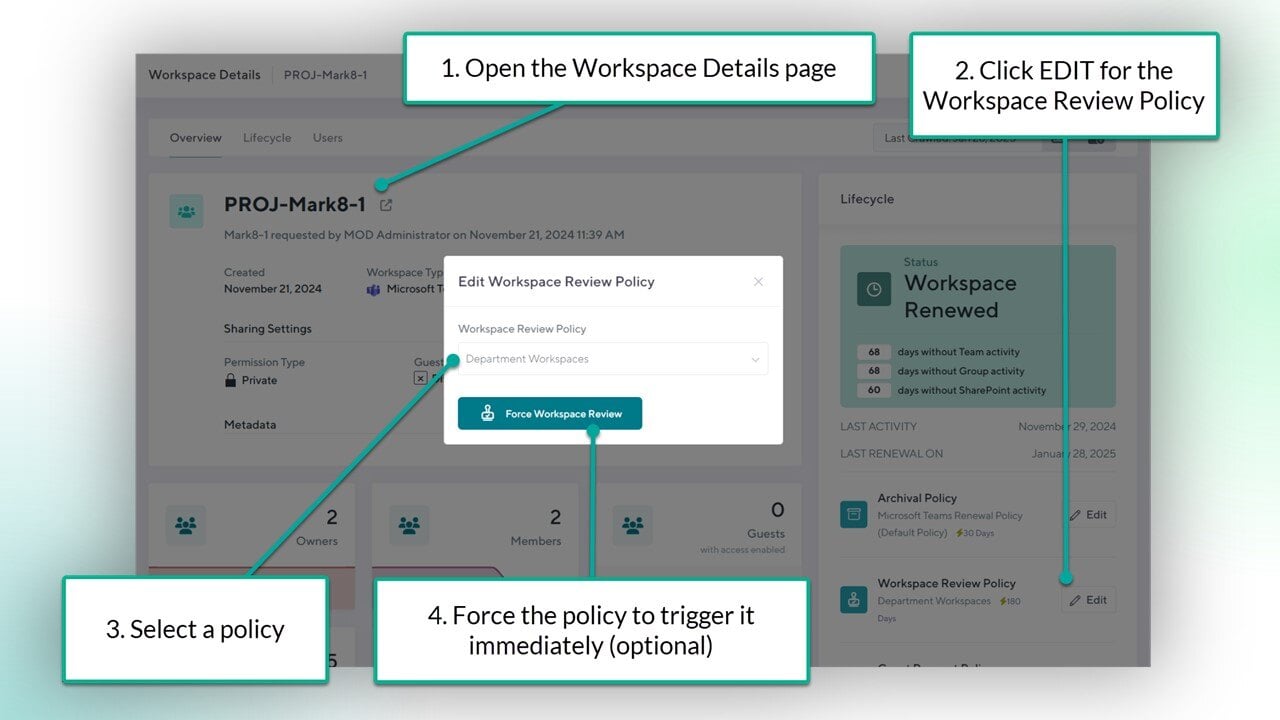
How to Assign a Workspace Review Policy
Open the workspace 'Reports' page. From there (Lifecycle Management > Workspace Reviews), you can assign the policies to existing Microsoft Teams and SharePoint Team site workspaces.
Method A: Assign the policy to a single workspace
Click the title of the workspace to open the Workspace Details page
Click the EDIT button for the Workspace Review Policy
Choose a policy from the drop-down menu
Force the policy to trigger it immediately (optional)
Method B: Assign the policy to multiple workspaces
Navigate to the Workspace 'Reports' page (Workspaces > Reports)
Select multiple workspaces (Teams or SharePoint Team sites)
Click the ACTIONS button
From the 'Action's menu, select 'Assign Policies'
From the 'Assign Policies to Workspaces' menu, choose a Workspace Review policy to assign to all selected workspaces
Click 'APPLY'

Assigned policies will not be triggered immediately unless forced. Orchestry will automatically trigger the review based on (1) the policy's recurrence schedule and (2) the date the policy was assigned to the workspace.