
Why Create a Workspace Review Policy for Department Workspaces?
Workspace Review policies are ideal for workspaces that rarely (or never) get archived, such as department workspaces.
Goals for the Department Workspace Review Policy
- Minimum membership requirements are enforced on all active workspaces
- Workspaces aren't left ownerless when someone leaves the org or changes roles
- Review guest access to the workspace regularly
- Reduce tenant storage used by version history in their SharePoint document libraries
For department workspaces, you can take advantage of every feature in your Workspace Review policy. As more policy features are released, you can update it as necessary.
Step 1: Name Your New Policy
To start a new Workspace Review policy:
- Go to the 'Review Policies' page in Orchestry
- Click the NEW button to start a new policy
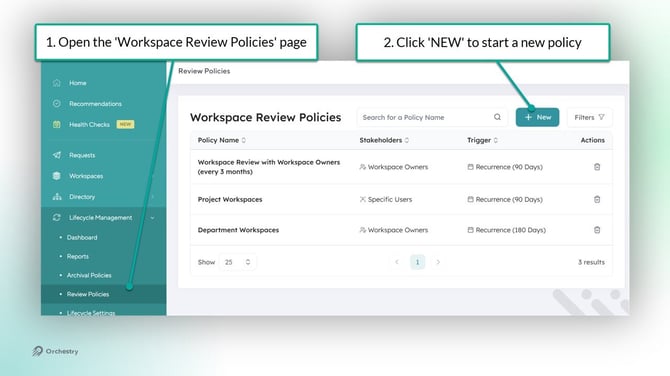
- Give NAME your policy
- Give your policy a DESCRIPTION
- Click SAVE to continue

Step 2: Configure the Policy
The policy's Configuration page is broken into four tabs.
The ACTIONS Tab
For your department Workspace Review policy, enable all applicable features on the ACTION tab.

Your policy must have at least ONE action enabled, IN ADDITION to the 'Welcome Page'.
The WELCOME PAGE Tab
On this tab, you can provide your end users with the context and information they need to complete the Workspace Review by updating the helper text.

The VERSION CLEANUP Tab
On this tab, you can configure version history cleanup for the workspace's SharePoint document libraries.

One of the goals behind this policy for department workspaces is to reduce the amount of tenant storage that's used by version history. To accomplish this, the configuration will:
- Use one-time cleanup to immediately delete old version history
- Introduce a new version history limit for files moving forward
The image below is a suggested configuration for Version Cleanup:

The MEMBERSHIP Tab
On this tab, you can configure minimum requirements for workspace owners and members. You can also enable Guest Reviews as part of this policy.

Two goals of this policy can be fulfilled on this tab:
- Ensure the workspace meeting the minimum number of owners and members as per your own governance policies
- Ensure guest users are reviewed regularly
To accomplish this for your own department workspaces, try a configuration similar to the one shown in the image below:

Step 3: Policy Execution
The Execution page of your Workspace Review policy allows you to configure the HOW and WHO of your policy, such as defining your stakeholders (reviewers), how often the policy is triggered, and more.

To help ensure your department workspaces are always completed annually, this policy will:
- Assign workspace owners as the stakeholders/reviewers
- Escalate to IT Admin if there is no owner, or if the task is not completed within 4 weeks
To accomplish this for your own workspaces, try a configuration similar to the one shown in the image below:

Step 4: Confirm
The final page of the policy allows you to review your configuration settings.
Click SAVE to finish creating your new Workspace Review policy.

Step 5: Assign the Policy to Workspaces
Workspace Review policies can be assigned to any Teams, SharePoint Team site or Viva Engage workspace.
SharePoint Communication sites are not supported at this time.
Assign the Policy to Existing Workspaces
From the Lifecycle Management 'Reports' page (https://app.orchestry.com/lifecycle/listing):
- Select the workspace(s) you want to assign your policy to
- On the page toolbar, click ASSIGN > WORKSPACE REVIEW
- On the dialogue window that appears, select a policy for each selected workspace
- Click ASSIGN to assign the policies.

TIP: You can FORCE policies to trigger them immediately. Otherwise, the policies will not trigger until the review cadence you defined expires.
Assign the Policy to Future Workspaces
From the Templates page (https://app.orchestry.com/workspaces/templates):
- Select the workspace template you want to assign the Workspace Review policy to
- On the 'Policies' tab, select the appropriate policy
- SAVE your changes
